This website may contain affiliate links and advertising so that we can provide recipes to you. Read my privacy policy.
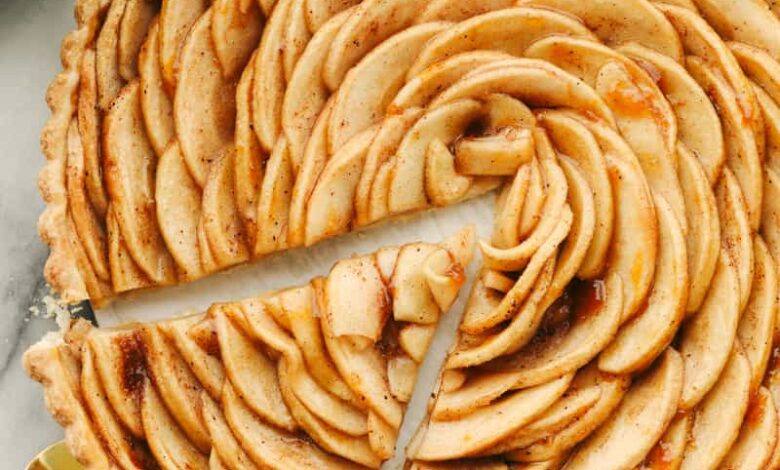
Loaded with fresh apples and baked to a perfect golden brown, this beautiful apple tart is the pastry of the summer! A combination of buttery, nutty, and tart, it tastes as good as it looks!
Nothing beats pies and tarts made at home. The flavor of a crumbly crust and fresh fruit is irresistible! My strawberry tart, lemon tart, and strawberry rhubarb pie are more beautiful and delicious pastries full of summer fruits!

Delicious French Apple Tart Recipe
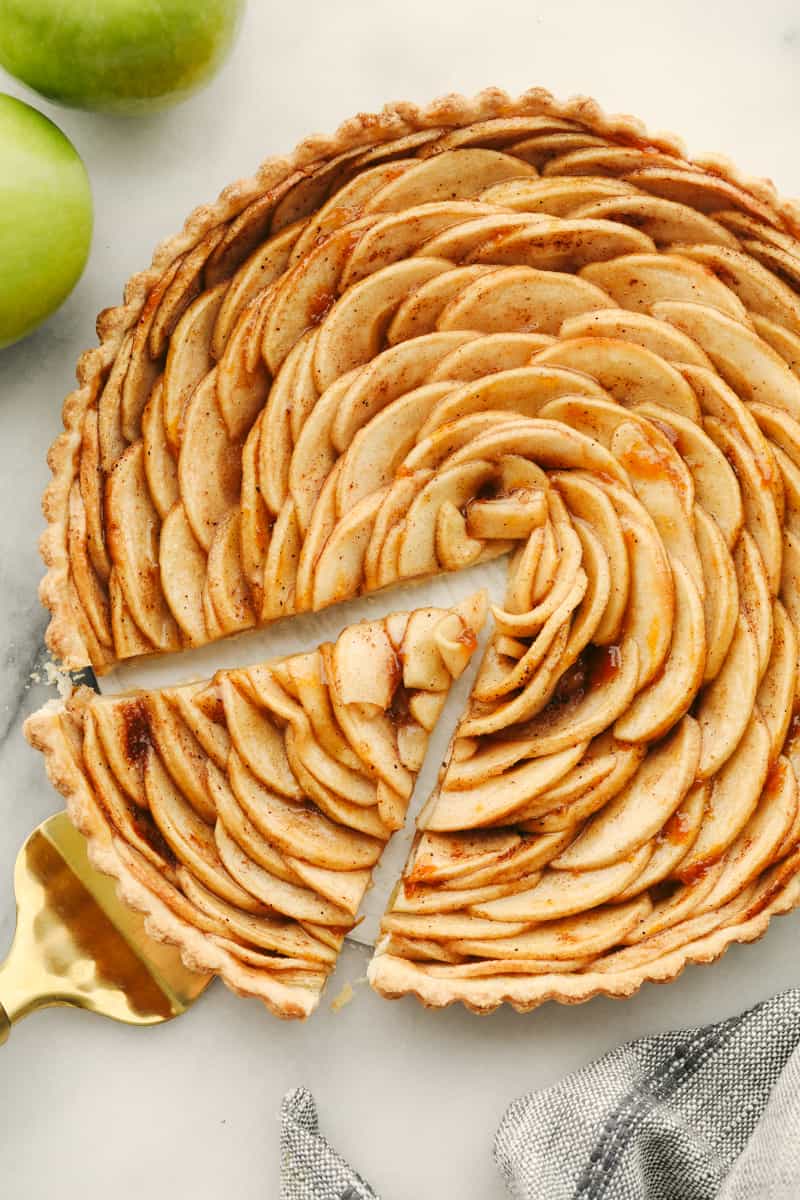
This incredible tart is going to steal the show with its perfect, buttery homemade crust and apple-filled center. Brushed with apricot preserves and sprinkled with cinnamon and nutmeg, each bite of this amazing pastry is bursting with sweet, tart, and nutty flavor. While this looks similar to an apple pie, the apple filling and crust taste a lot different. This apple tart recipe uses a technique called ‘macerating’ to soften fruit instead of making a thick apple filling with cornstarch, butter, and sugar. To macerate your apples, you soak them in a sugar mixture until they soften. This way, they become malleable enough to arrange in your crust. Because there is no filling, the end texture of this tart is more firm and crisp than an apple pie.
I, personally, like the way this tart tastes more than an apple pie. It’s beautiful, too! You are able to get neat, crisp slices without globs of apple filling spilling out. This apple tart is light and delicious when eaten on its own, but is also amazing a la mode with a scoop of homemade ice cream on top. Fresh whipped cream or crème fraîche taste great as toppings as well. I know you are going to love this tart as much as I do! It just takes a little prep and arranging of apple slices to create a tasty, lavish dessert. Honestly, putting this tart together is one of my favorite parts of this whole process. It’s so fun to see something beautiful come together!
Apple Tart Ingredients
This delicious recipe utilizes a lot of pantry staples to make your life a little easier! I know you are going to love the way these simple ingredients come together to create something that looks (and tastes!) like it came straight out of a French bakery! Measurements for each ingredient can be found in the recipe card below.
Crust
- Flour: I use all-purpose flour in this recipe. Because of its low protein content, I have found that it keeps the crust from becoming too dense.
- Granulated Sugar: This is going to add sweetness to your crust and help ingredients meld together.
- Salt: I add salt to the crust to enhance the overall flavor.
- Butter: I use unsalted butter, cold.
- Egg Yolk: Adding an egg yolk to your dough will make it easier to shape and help give it a perfect crumbly texture when baked.
- Cold Water: I add cold water as needed, one tablespoon at a time, until my dough has reached the right consistency.
Filling
- Apples: You can use any kind of apple you want here. I use granny smith apples in this recipe for their tart flavor.
- Granulated Sugar: This will add sweetness and allow your apple slices to macerate.
- Cinnamon: Adds a subtle spice to the overall flavor of the tart.
- Nutmeg: Woody, warm, and nutty, nutmeg adds amazing aromatic flavor to this tart. It pairs wonderfully with cinnamon.
- Vanilla Extract: Added to enhance flavors. I like to use pure vanilla extract for best results.
- Lemon Juice: For a hint of tart flavor and helps to keep apples from browning.
- Salt: Add a dash to enhance flavors.
- Apricot Preserves: Brushing apricot preserves across the top of your tart will give it that bakery-worthy sheen. If you don’t want to use apricot, any jelly will do!

How to Make a French Apple Tart
While the steps of making an apple tart are fairly simple, making pastries truly is an art! Don’t skip out on taking a little extra time to create an eye-catching design. If you are a little intimidated, check out my tips below on slicing your apples paper-thin and creating the perfect crust! I know you will love this recipe and be able to create something both tasty and beautiful.
Crust
- Cut Butter Into Dry Ingredients: To begin, in a medium bowl, mix the flour, sugar and salt together. Using a fork or a pastry blender, cut the cold butter into the flour mixture and continue to cut it in until it begins to resemble breadcrumbs.
- Mix in Egg Yolk: Add in the egg yolk and mix together as best you can with a fork before adding 2 tbsp of the chilled water. Knead the dough together gently, adding more water if necessary to bring the dough together in a ball.
- Chill: Next, wrap the dough in plastic wrap and allow to chill in the fridge for 30 minutes.
- Roll Out Dough: Once chilled, roll the dough out into a ¼ inch thick circle. If the dough is cracking as you roll, give it a few minutes to warm up slightly before trying again. To transfer it to the tart pan, roll the pastry up on your rolling pin and unroll it over the tart pan.
- Press Dough Into Pan: Press the bottom and sides of the pan. Trim the excess dough by rolling the rolling pin over the top of the tart pan. Prick the bottom of the pan a few times with a fork and place in the fridge while you prepare the filling.
Filling
- Preheat Oven: First, preheat the oven to 375°.
- Macerate Apple Slices: In a medium bowl toss the sliced apples, sugar, cinnamon, nutmeg, vanilla and lemon juice together. Allow to macerate for 10-15 minutes.
- Create Apple Design: Stir again before laying the apples in the tart shell in your desired design. If you want to make them a rose, overlap the apples in a circular pattern spiraling inward. Because the apples spent time macerating, they will be soft and able to bend with the curve of the pan. The thinner the slices, the easier they will be to bend.
- Bake: Next, bake for about 50-55 minutes, until the apples are tender and the crust is nice and golden brown.
- Brush Apples With Apricot Preserves: Once cooled, mix a little water with some apricot preserves and brush them over the apples to get a nice sheen.

Tips For Making The Best Crust
The perfect tart starts at its crust. Use these great tips and tricks to make sure it turns out flaky and delicious every time!
- Almond Flour: For a more traditional, crumbly crust, you can substitute all-purpose flour for almond flour.
- Using a Food Processor: Instead of mixing ingredients together, you can use a food processor to prepare your crust. It will give you a more fine and delicate texture.
- Keep Butter Cold: Adding melted or softened butter to your mixture can ultimately throw off your crust. Cold butter is the first step in keeping everyting buttery and flaky.
- Don’t Work Dough Too Much: If you knead your dough too much, gluten will develop. Baking dough with too much gluten content will make it shrivel.
- Prick Your Dough: Use a fork to prick the bottom of your crust before baking. This simple step will keep your tart from shrinking when it bakes.
- Refrigerate Dough: For the ultimate flaky crust, refrigerate your crust for an hour before baking. When a cold crust goes into the oven, the butter melts quickly and results in flaky goodness.

Choosing Apples and Creating a Design
Even if you are new to making pastries, you can get all of those amazing bakery flavors and gorgeous visuals at home with a few simple steps. Everything you need to know is right here!
- Apple Types: Any kind of apple will work here, but different apples will leave you with a different tasting tart. I like to use granny smith apples because of how sour they are- I feel like they balance out overly sweet flavors. Galas are also a popular apple to use because of their natural sweetness. Additionally, golden delicious and honey crisp are other favorites of mine in baking pastries and pies.
- Macerating Apples: The longer you macerate apple slices in your sugar mixture, the softer they will become. This will make them easier to assemble into a design. Apple slices can even be macerated overnight for best results.
- Skin On or Off: You can peel your apples before slicing, but my recommendation is to leave the skin on for a beautiful pop of color!
- Cutting Slices: To begin, cut all four sides off of your apple so you are left with a square-shaped core. The thinner slices, the better. They are not only easier to shape but will cook through more thoroughly. Take each of the four apple slices you are left with and lay them flat. Then, using a very sharp knife, cut them into thin slices about ⅛ of an inch thick. I recommend using a serrated knife to really grab the apple and keep slices the same thickness all the way through.
- Arranging Slices: Be sure to stand your slices up vertically. Start around the outer perimeter, going towards the center of your tart, layer by layer until a rose-like shape is formed. Keeping your slices the same height will leave you with the best result. If you need to, you can cut off the bottom of some of your slices to keep a uniform height.

Storing Leftover Apple Tart
- At Room Temperature: You can keep your apple tart at room temperature, covered with plastic wrap for up to 2 days.
- In the Refrigerator: When covered in plastic wrap, your apple tart will also keep in the refrigerator for 4-5 days.
- Reheating: For that just out of the oven deliciousness, pop your leftover tart in the oven at 170 degrees Fahrenheit until warmed through. You can also microwave your tart at 10 second intervals until warm. Serve with a scoop of ice cream for a tasty anytime dessert!
- In the Freezer: Apple tarts don’t freeze very well, but you can freeze dough to have on hand! Simply store in a ziplock bag and then thaw in the fridge one day before you plan on baking.

Crust
-
In a medium bowl, mix the flour, sugar and salt together. Using a fork or a pastry blender, cut the cold butter into the flour mixture and continue to cut it in until it begins to resemble breadcrumbs.
-
Add in the egg yolk and mix together as best you can with a fork before adding 2 tbsp of the chilled water. Knead the dough together gently, adding more water if necessary to bring the dough together in a ball.
-
Wrap the dough in plastic wrap and allow to chill in the fridge for 30 minutes.
-
Once chilled, roll the dough out into a ¼ inch thick circle. If the dough is cracking as you roll, give it a few minutes to warm up slightly before trying again. To transfer it to the tart pan, roll the pastry up on your rolling pin and unroll it over the tart pan.
-
Press the bottom and sides of the pan. Trim the excess dough by rolling the rolling pin over the top of the tart pan. Prick the bottom of the pan a few times with a fork and place in the fridge while you prepare the filling.
Filling
-
Preheat the oven to 375°.
-
In a medium bowl toss the sliced apples, sugar, cinnamon, nutmeg, vanilla and lemon juice together. Allow to macerate for 10-15 minutes.
-
Stir again before laying the apples in the tart shell in your desired design. If you want to make them a rose, overlap the apples in a circular pattern spiraling inward. Because the apples spent time macerating, they will be soft and able to bend with the curve of the pan. The thinner the slices, the easier they will be to bend.
-
Bake for about 50-55 minutes, until the apples are tender and the crust is nice and golden brown. Once cooled, mix a little water with some apricot preserves and brush them over the apples to get a nice sheen.
Serves: 8
Calories229kcal (11%)Carbohydrates40g (13%)Protein3g (6%)Fat7g (11%)Saturated Fat4g (20%)Polyunsaturated Fat1gMonounsaturated Fat2gTrans Fat1gCholesterol40mg (13%)Sodium76mg (3%)Potassium155mg (4%)Fiber3g (12%)Sugar18g (20%)Vitamin A272IU (5%)Vitamin C6mg (7%)Calcium17mg (2%)Iron1mg (6%)
All nutritional information is based on third party calculations and is only an estimate. Each recipe and nutritional value will vary depending on the brands you use, measuring methods and portion sizes per household.