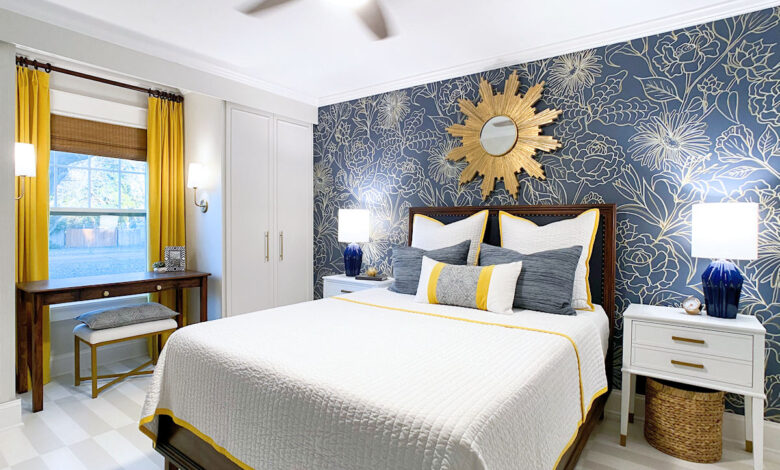
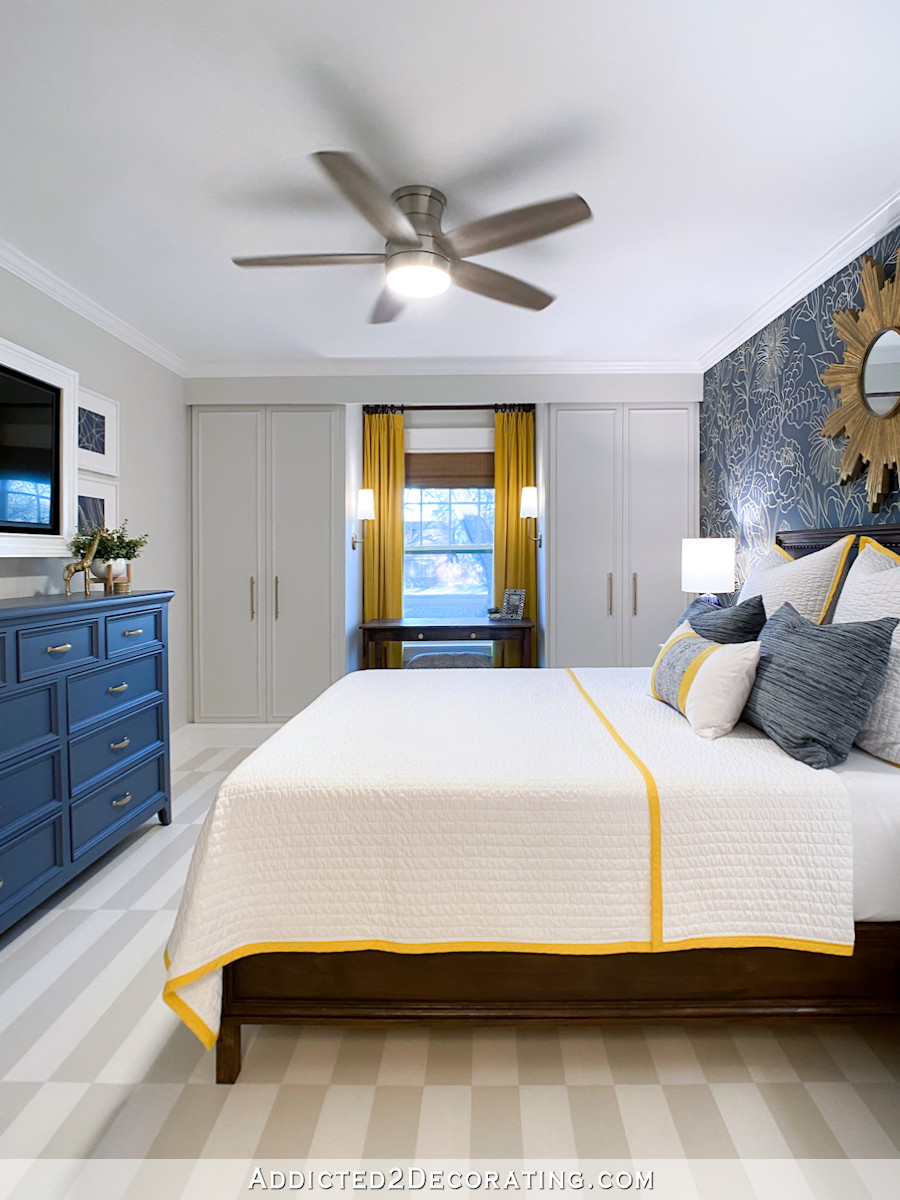
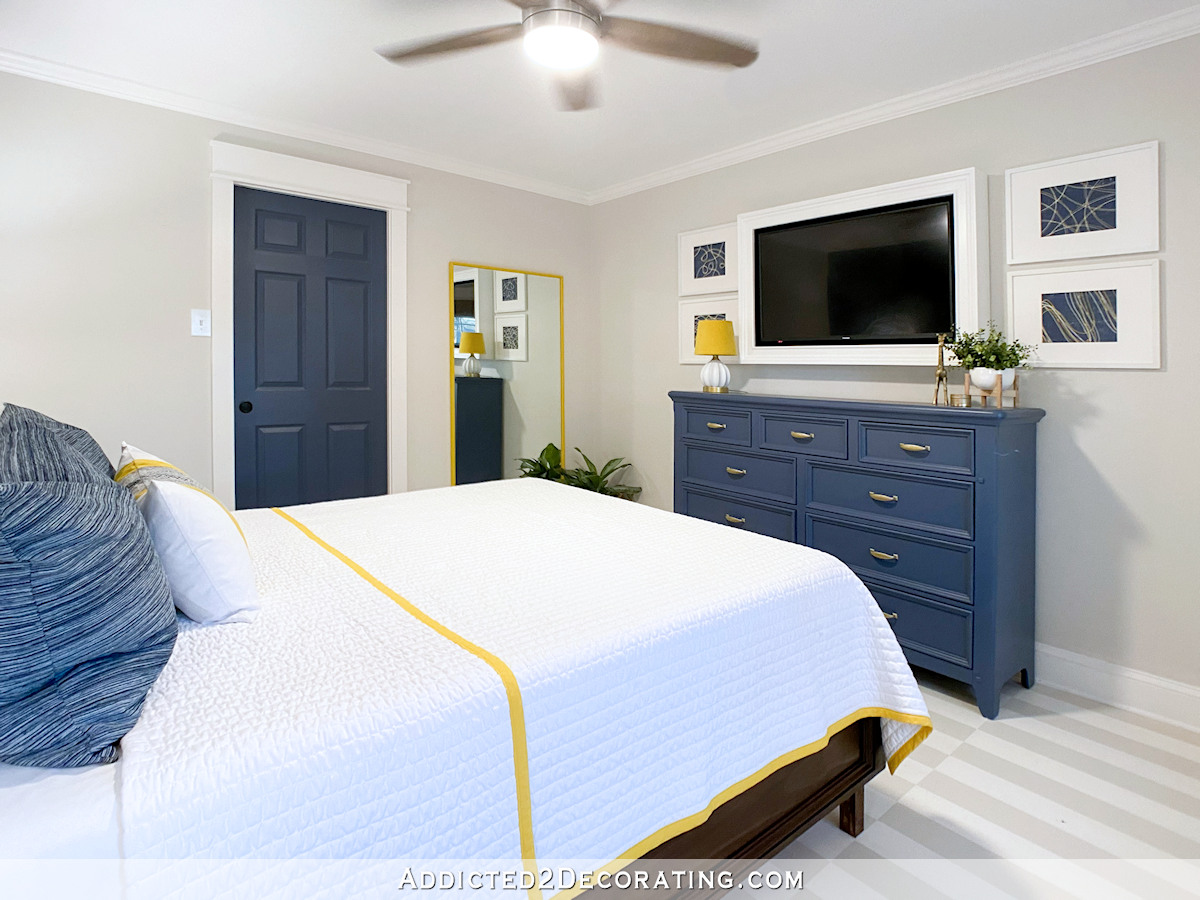
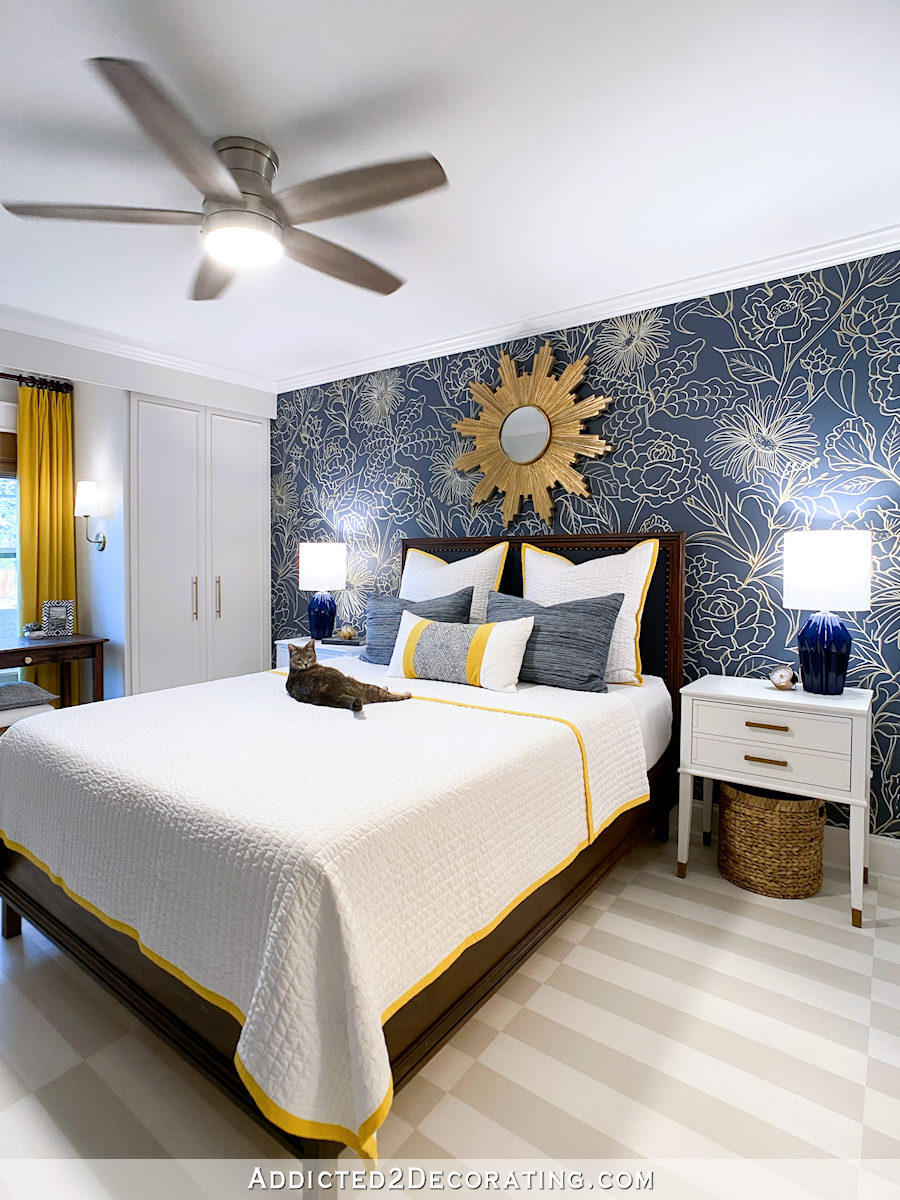
I finally have pictures of the finished guest bedroom! This room was in progress for over a year, which was way too long. But considering that the year was 2020…well, a year-long bedroom remodel seems fitting.
Anyway, here’s how it turned out…
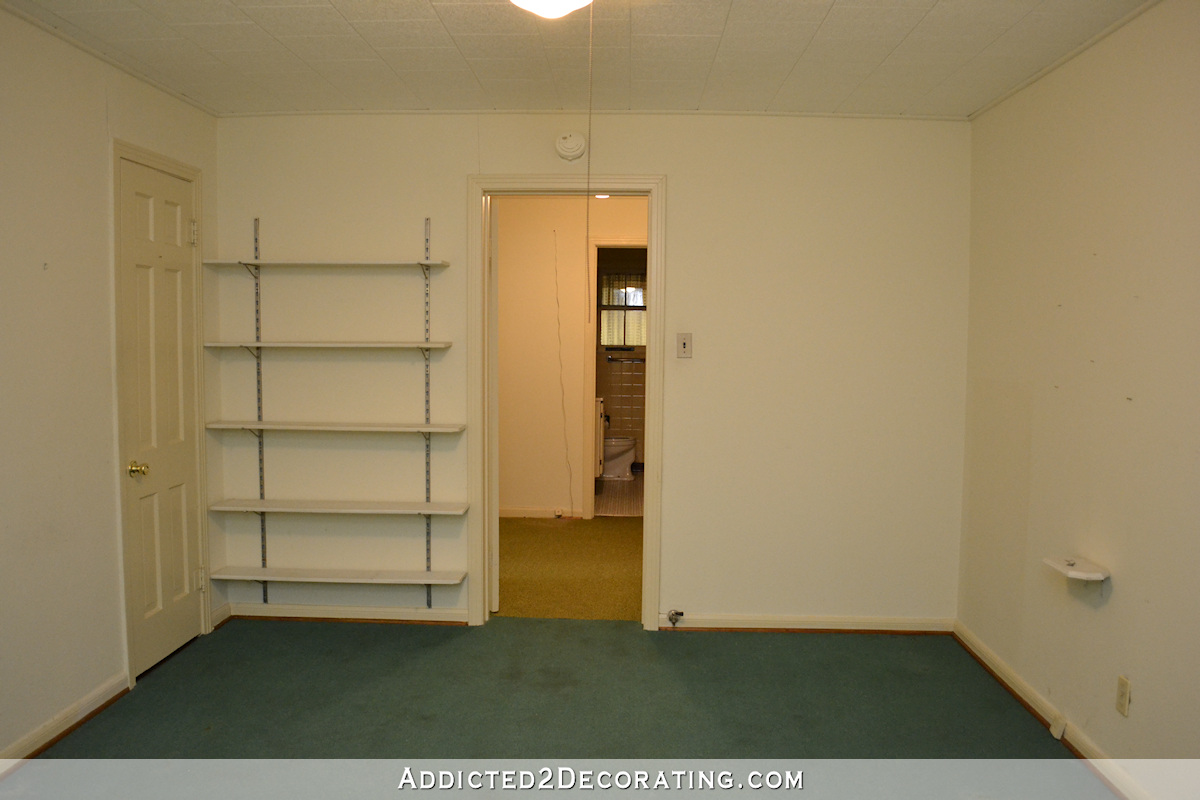
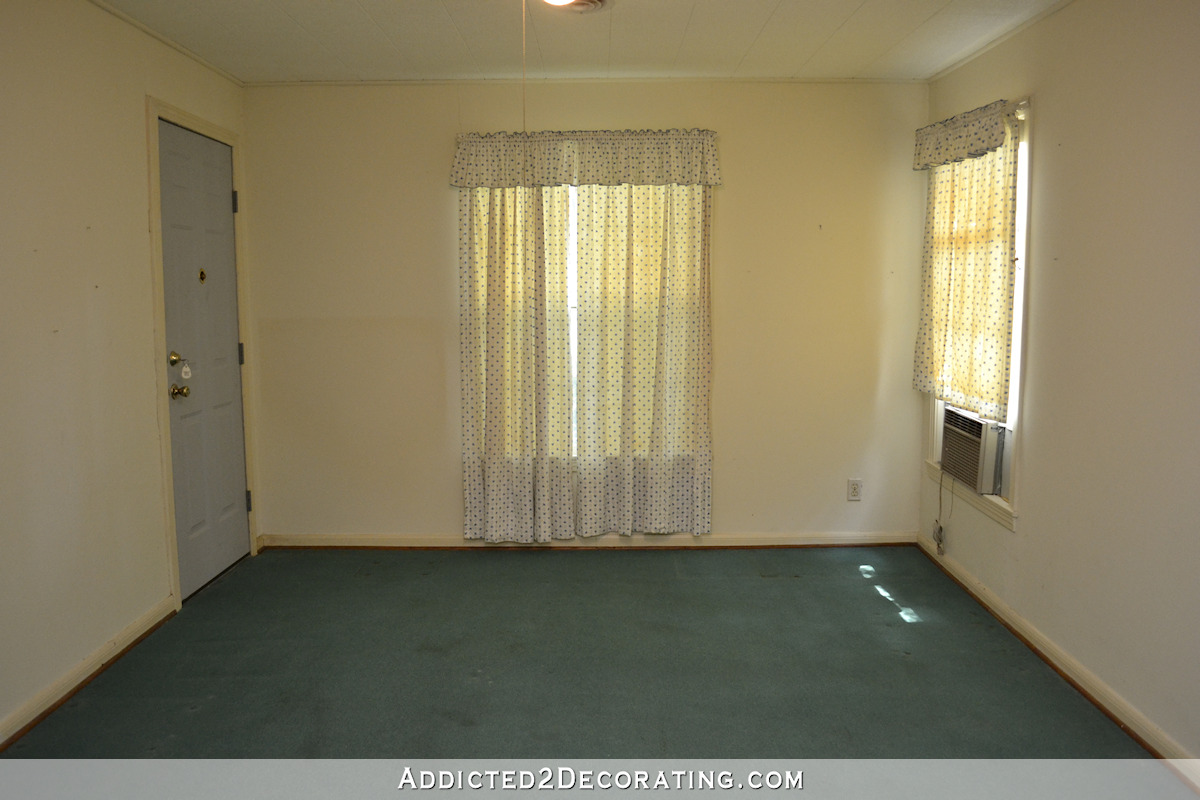
This is not a huge bedroom, but there were some pretty extensive projects that went into it. Here’s how the room looked when we bought the house in 2013…
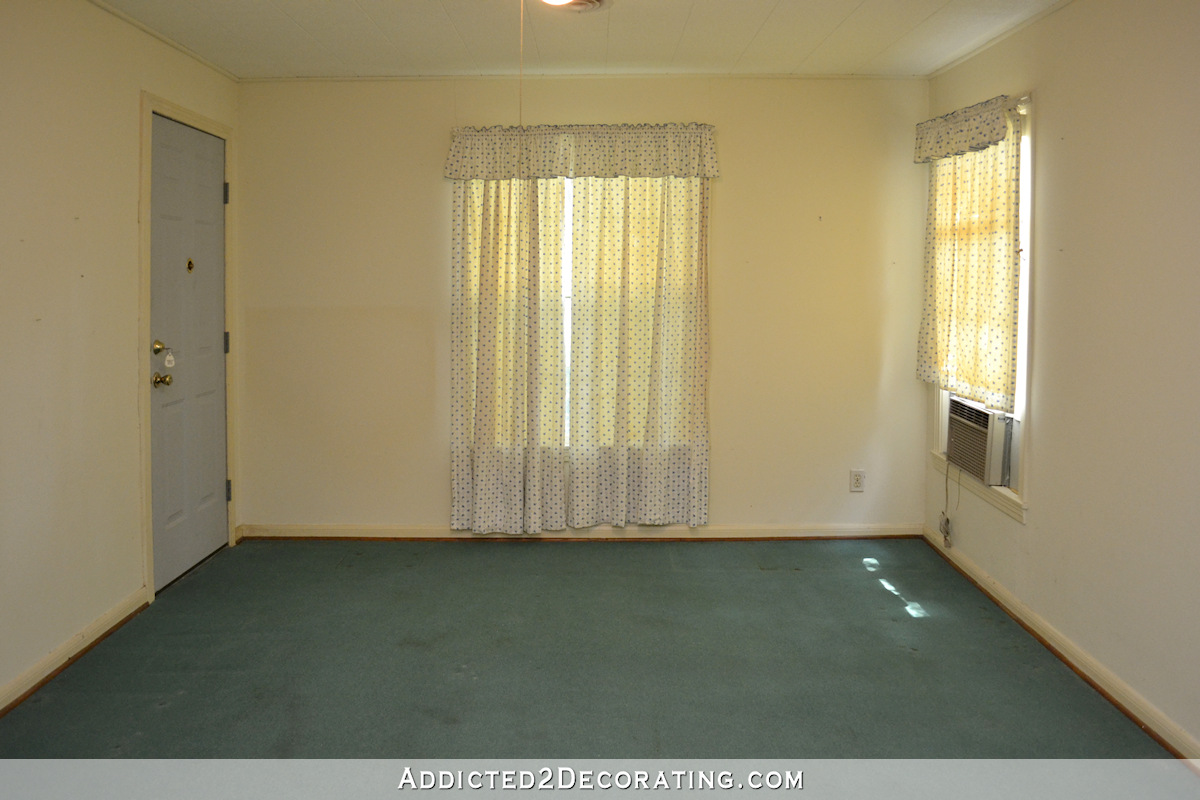
You can see that it had teal carpet (which was a departure from the green carpet in the rest of the house). It also had a door leading out to the front porch, and a window on the wall opposite the door. We lived with that window unit air conditioner in this room long after we had our HVAC system installed because that window had been painted in that open position and wouldn’t close.
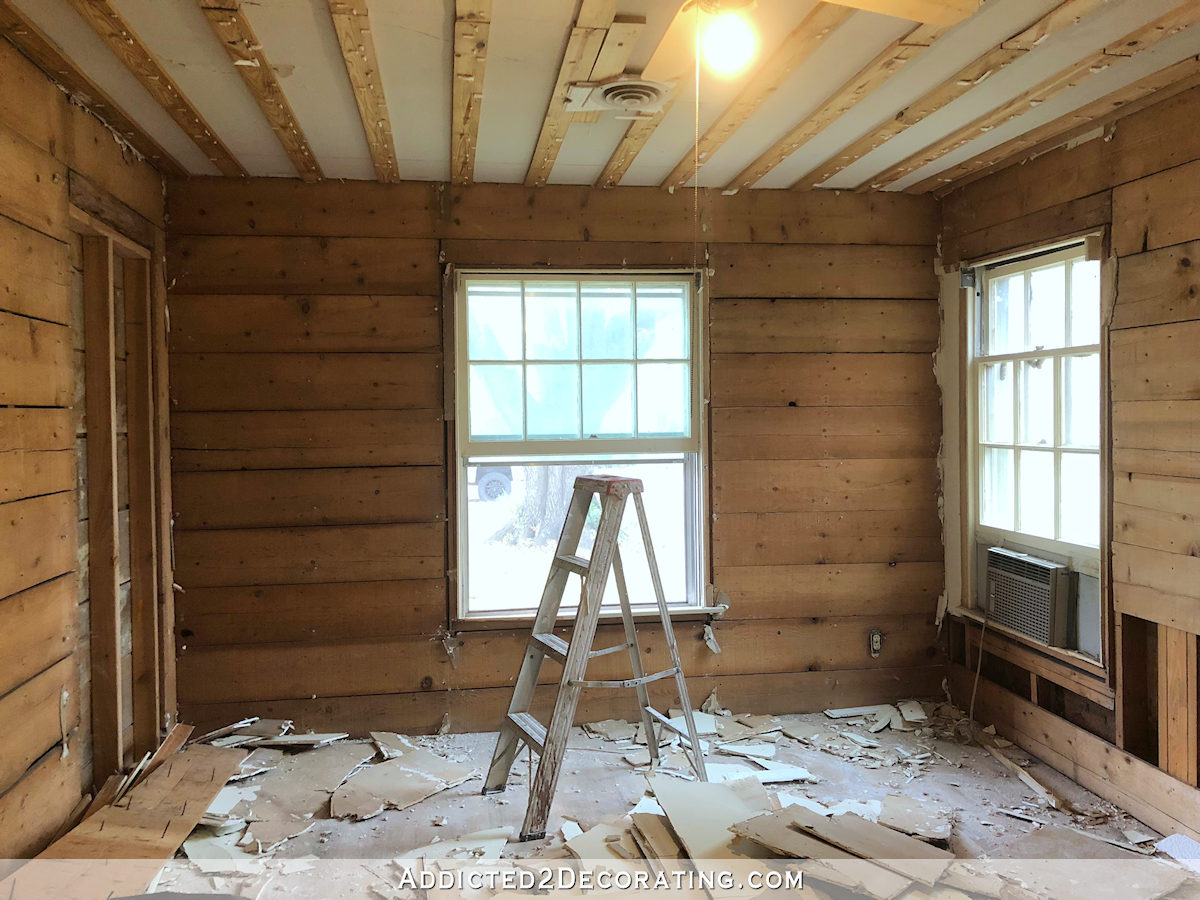
So when I finally decided exactly how I wanted to use this room, and came up with the layout I wanted, both the door and the opposing window had to go.
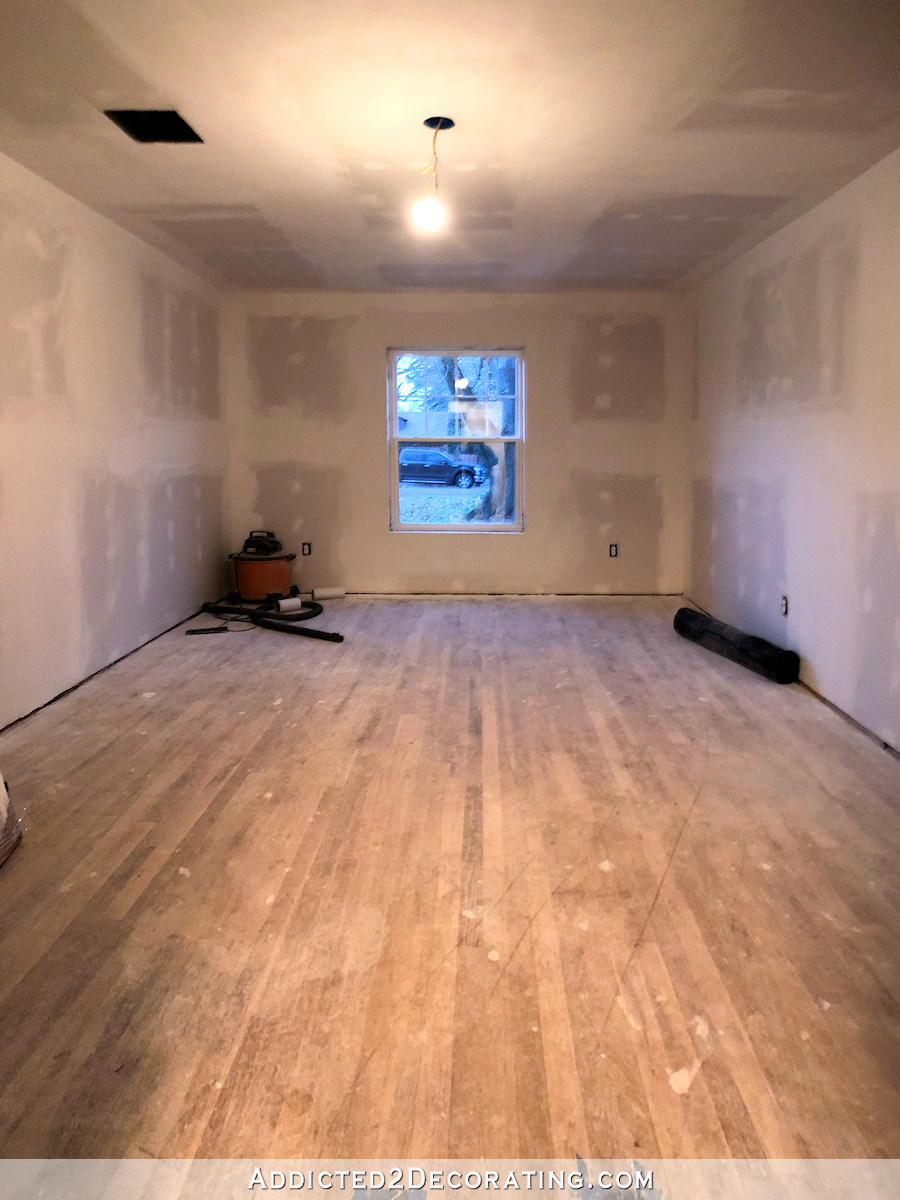
I didn’t do that part by myself. I decided a while back that I’ve paid my drywall dues, and I’ll never drywall another room myself again. So I hired out that work, and when they did their part, they handed the room over to me looking exactly like it did in that picture above.
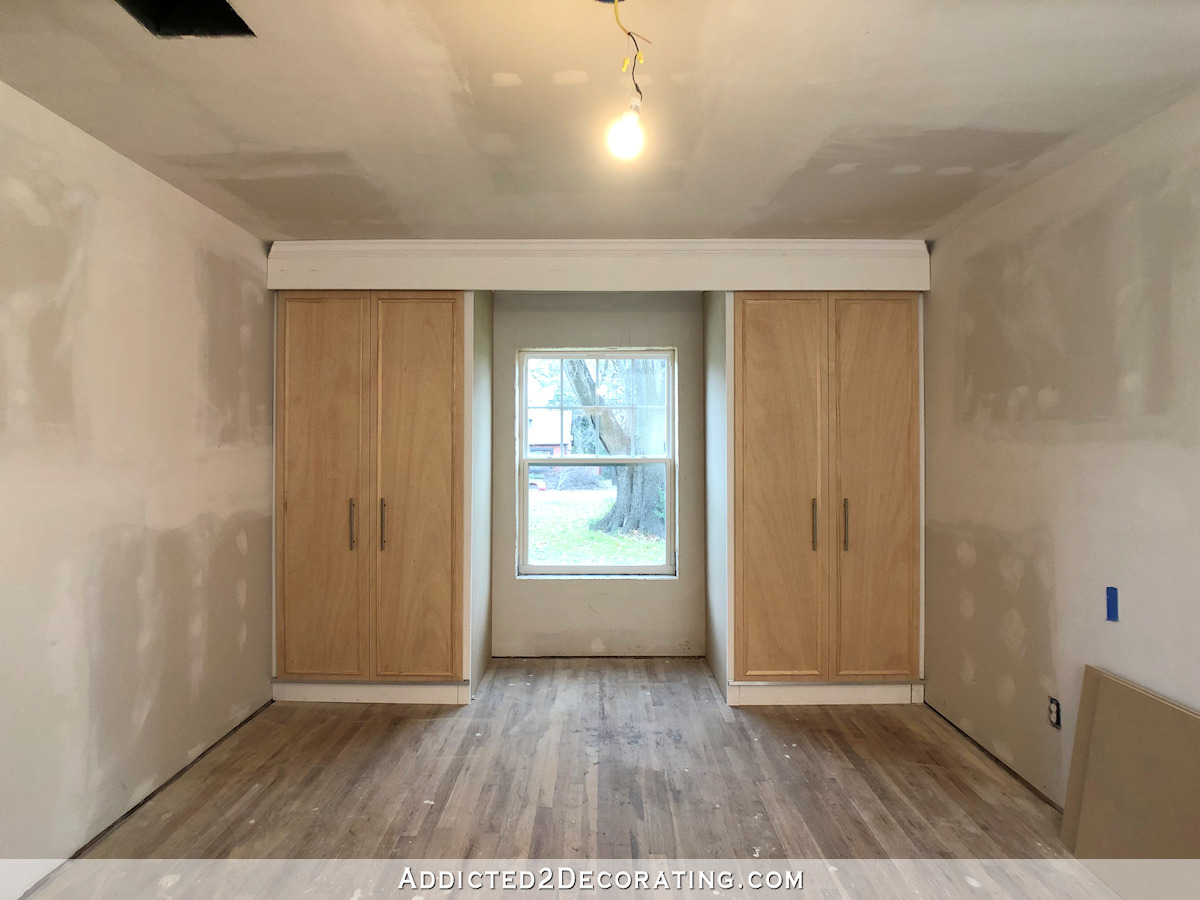
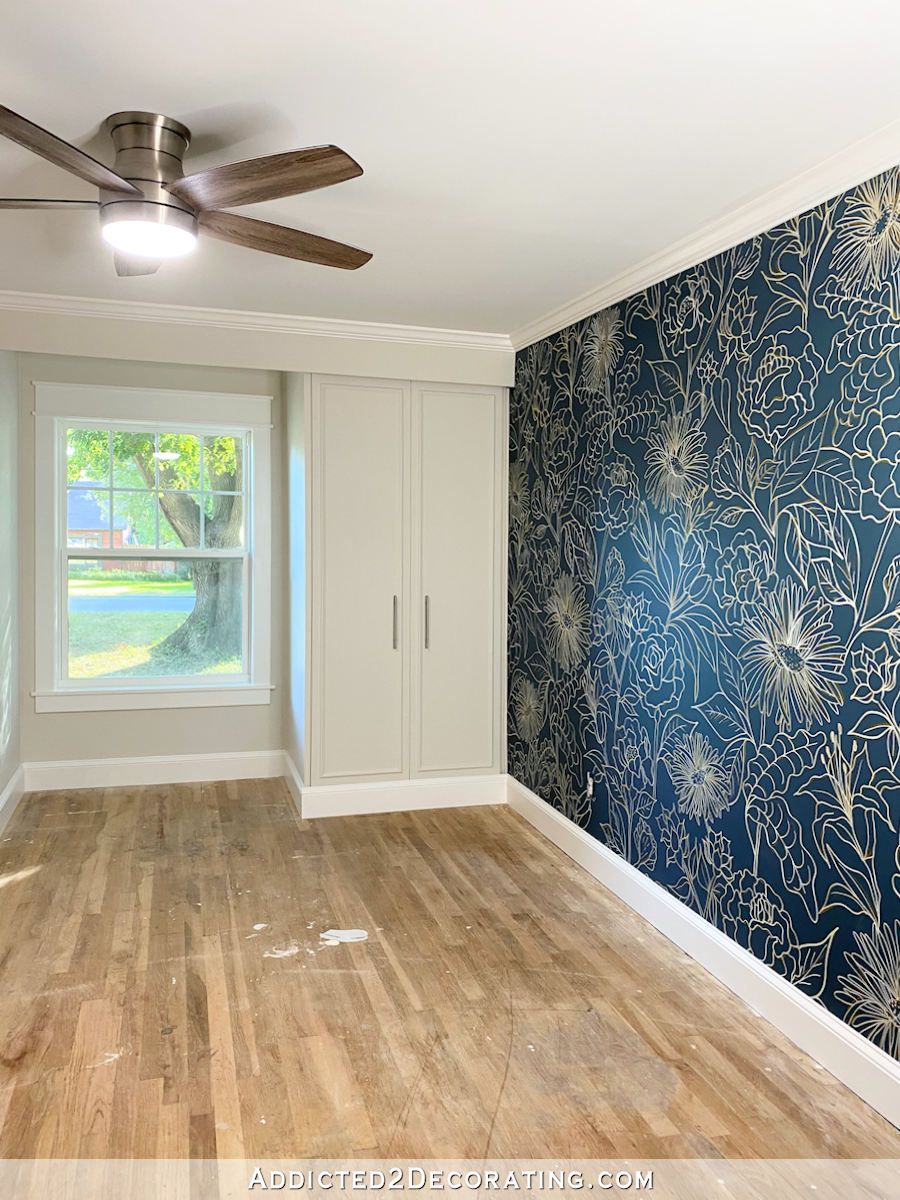
So the rest was up to me, and I started with building two closets flanking the one window that was left in the room.
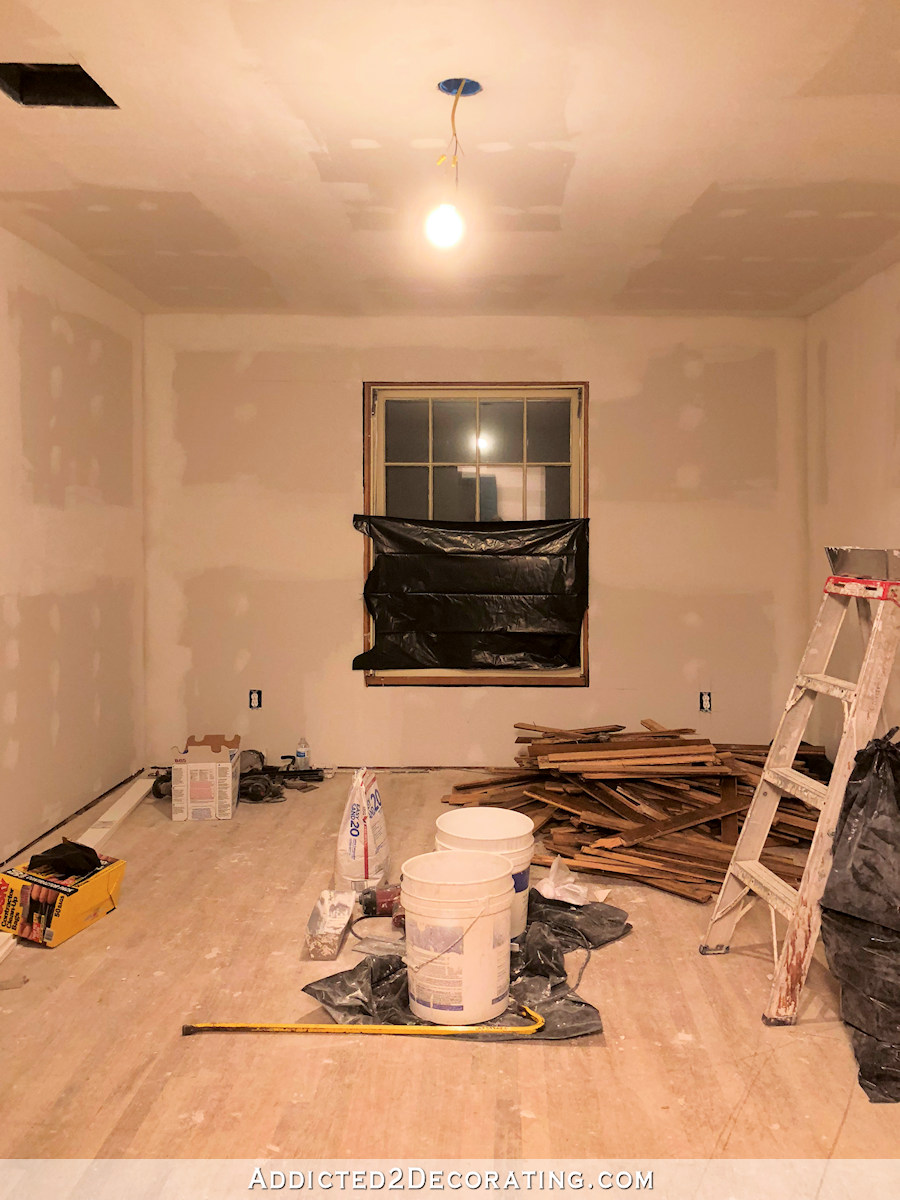
And just for full disclosure, you’ll notice that in the room with the new but unfinished drywall, there’s an air vent on the ceiling. In the after pictures of the finished room, that air vent has disappeared.
Well, that air vent is still there, but here’s what happened. I spent all morning yesterday getting the room all clean, getting the bedding just so, sweeping and mopping the floor, etc. Then got my tripod and camera all set up, got Felicity out of the room (which didn’t last, as you’ll see in later photos, because this bed is her favorite place to sleep during the day), and went to snap my very first picture. That’s when I noticed that I had completely forgotten to put the vent cover back on that vent!
We’ve been living without a vent cover on there for so long (over a year now) that I’ve just gotten used to seeing that black hole on the ceiling. So I didn’t even “see” it until I saw that first photo. Well, there was no way I was dragging a ladder and tools into my newly cleaned room and freshly mopped floors to create more dust, so I just edited out that black hole on the ceiling. 😀 The vent is still there, and I will get the vent cover on the ceiling ASAP now that I actually “see” the black hole again.
Anyway, moving on…
Because the room isn’t huge, and swinging doors would have hit the nightstand on the right side, I decided to put sliding doors on the closets.
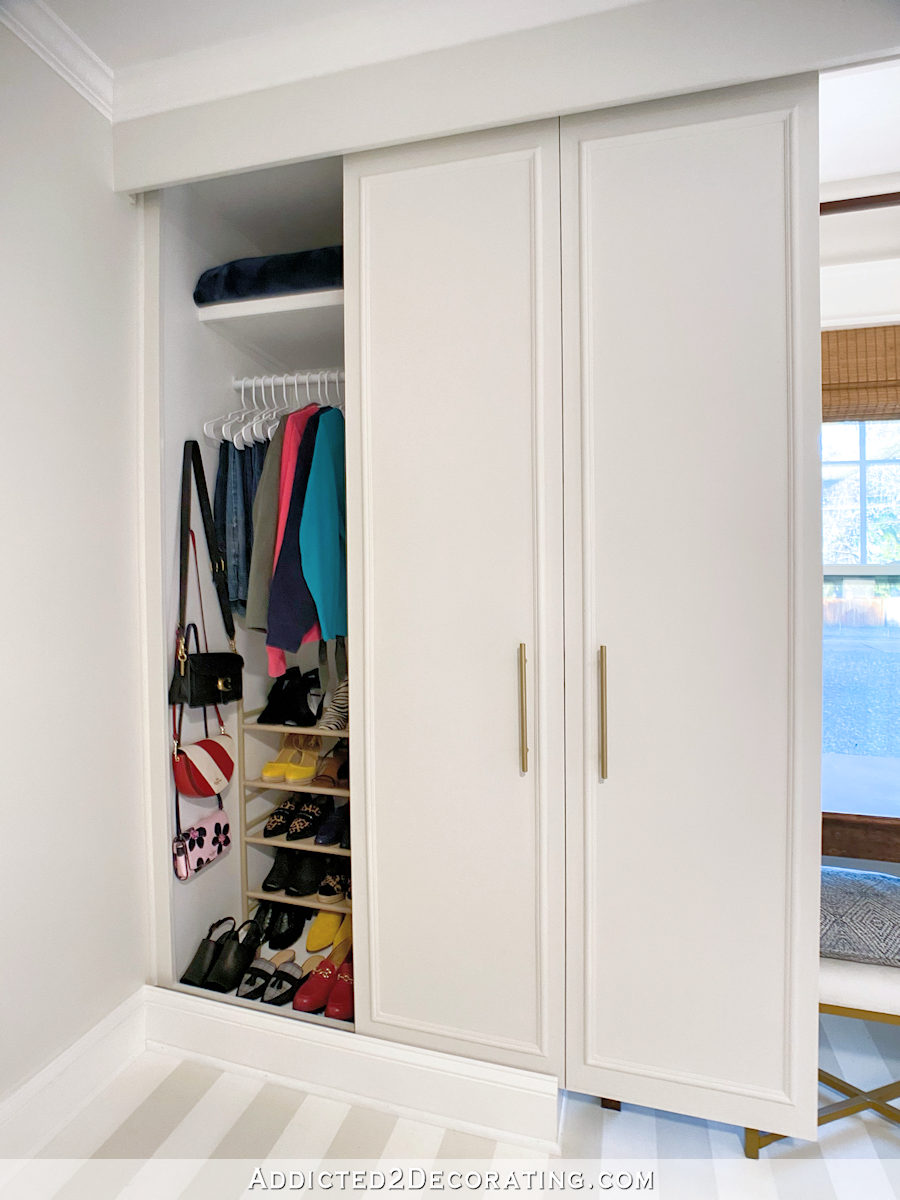
So that’s why the closets have that header above them and stretching the whole width of the room. That header is covering a very unattractive metal track for the sliding doors.
Those closets flanking the window created this cute little nook in the window area.
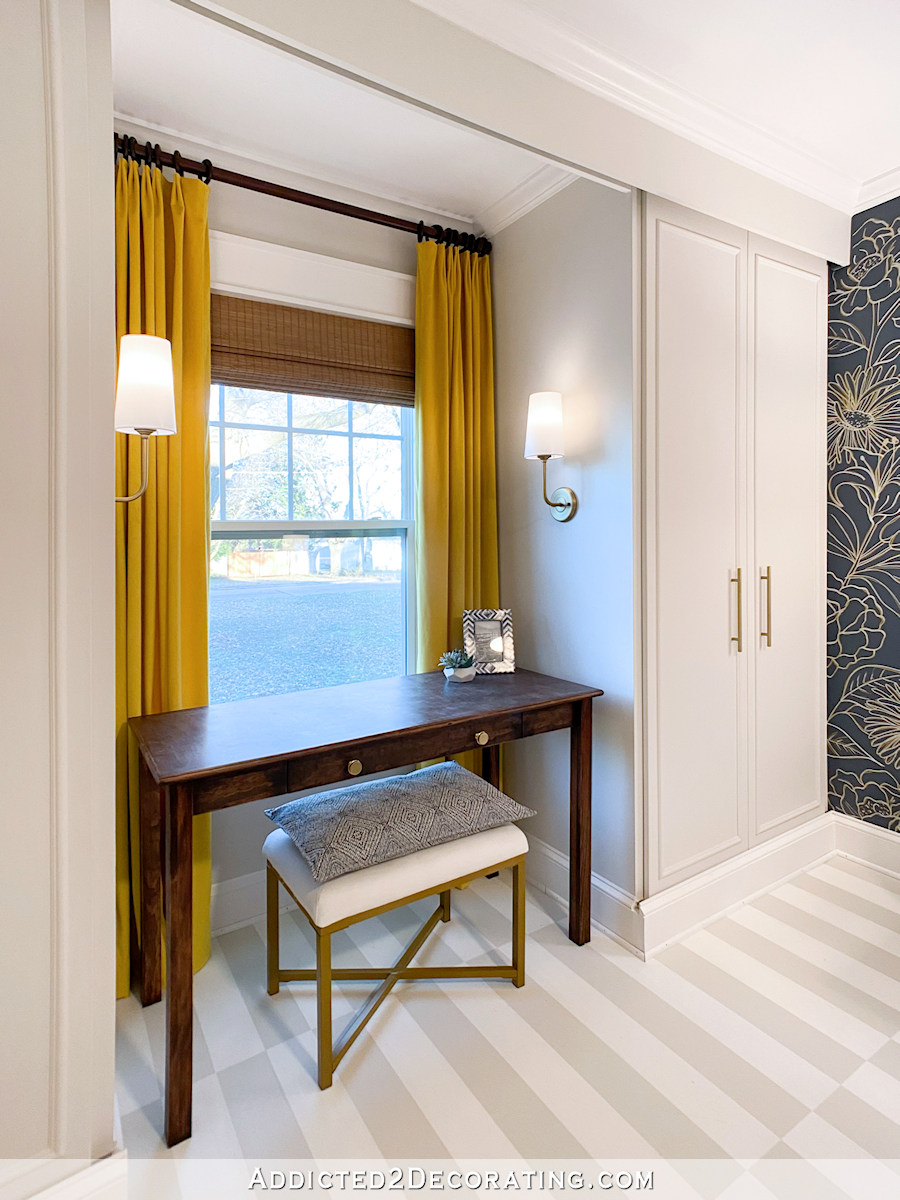
I had originally intended to do a built-in window seat, but since Matt and I will be using this bedroom for the foreseeable future until we can add on to the house (which will include a new master suite), I decided that for Matt’s sake, it would be safer to have something in that area that is light a movable.
So for now, I built a very simple writing desk to fill that space. And because I built it myself, I could customize the size for a perfect fit.
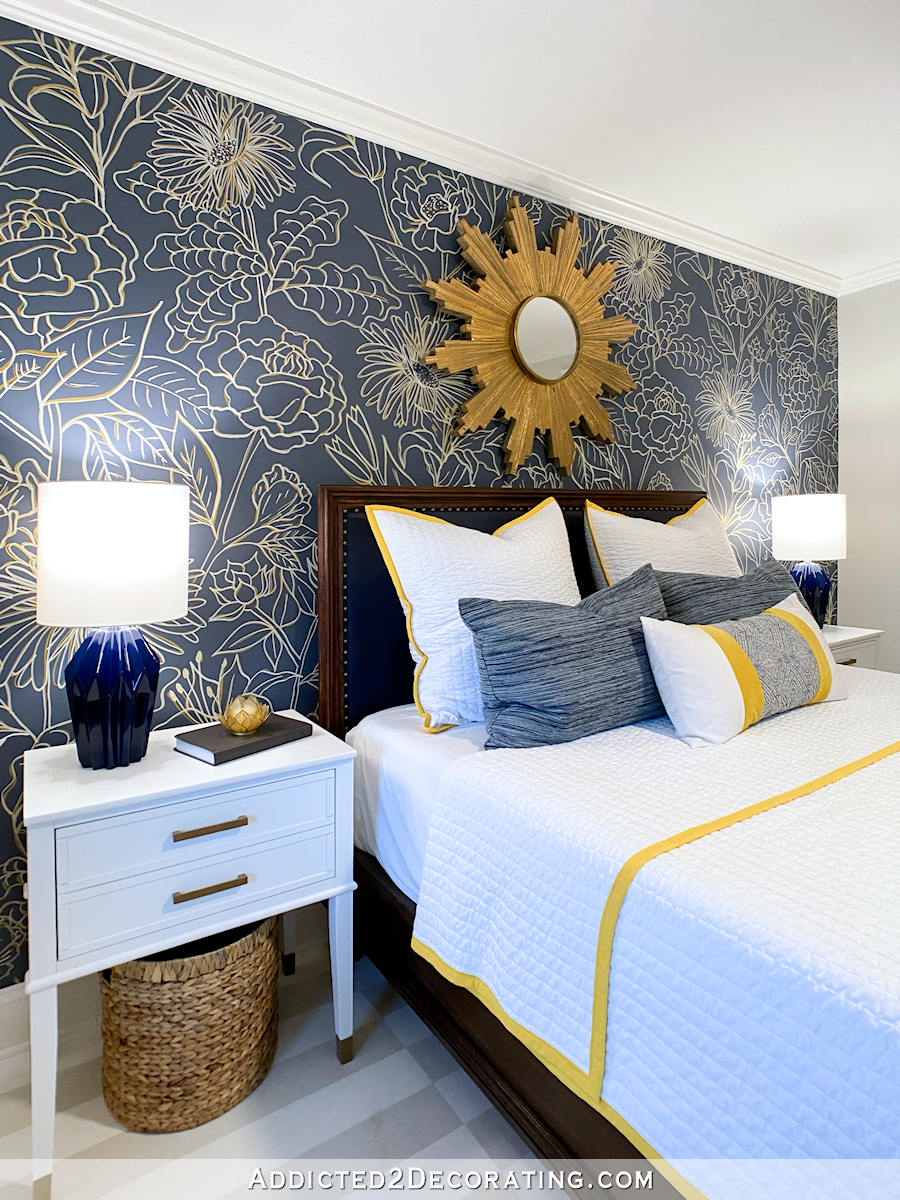
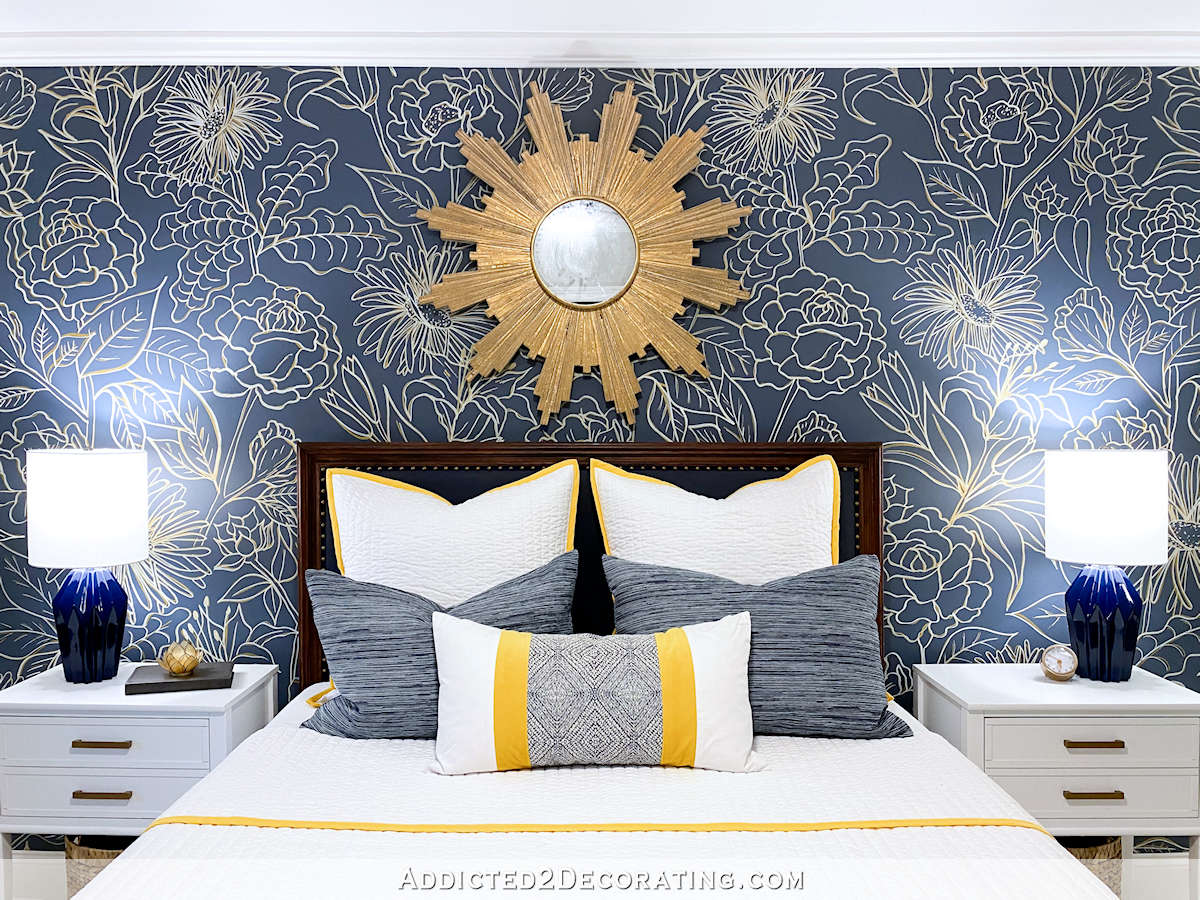
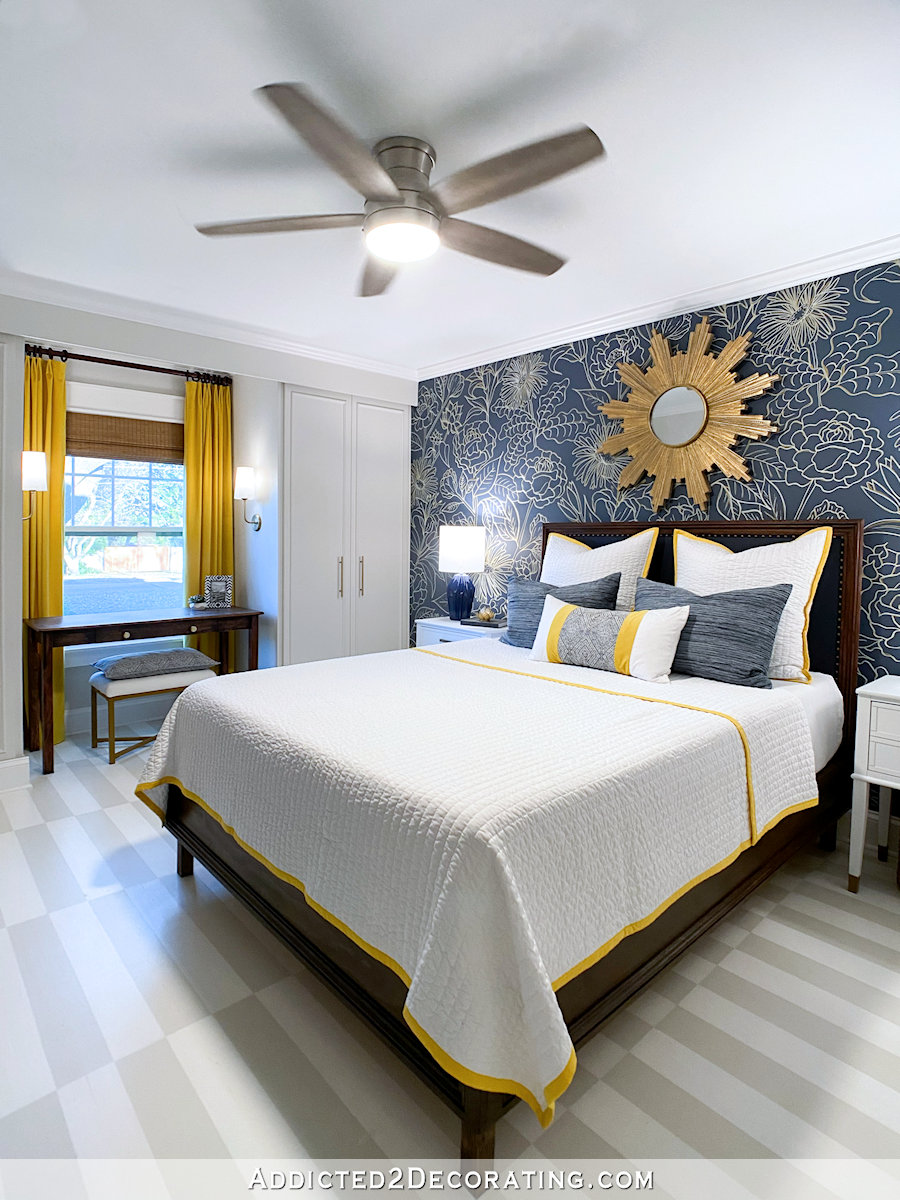
The wall design is the main feature of the room. This is a hand drawn design that I did using gold and white acrylic markers. You can click here to see the details of that project.
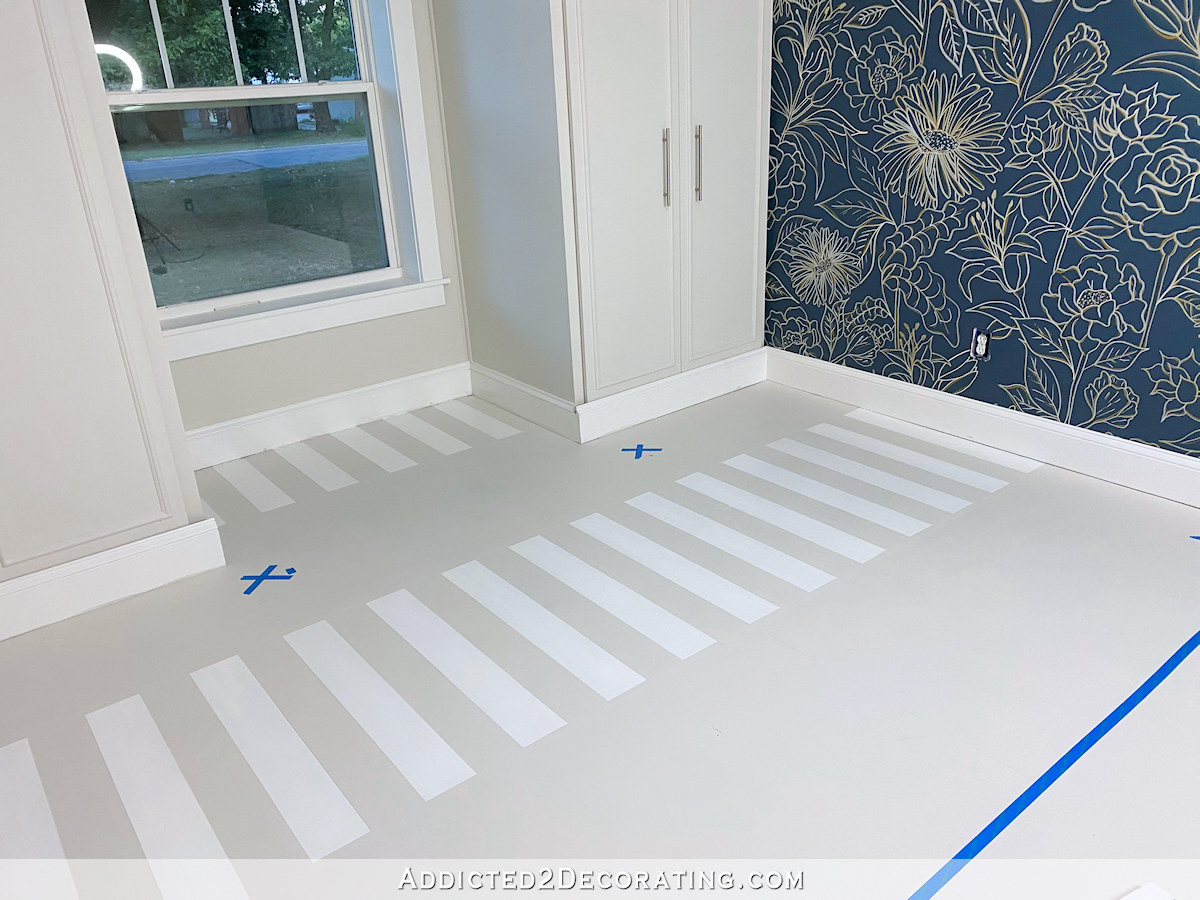
The flooring in this room is the same red oak hardwood flooring that is in the rest of the house. But because this floor had some stains on it, I decided to paint the floor instead of staining it to match the rest of the house. You can click here to see the details of the painted floor project.

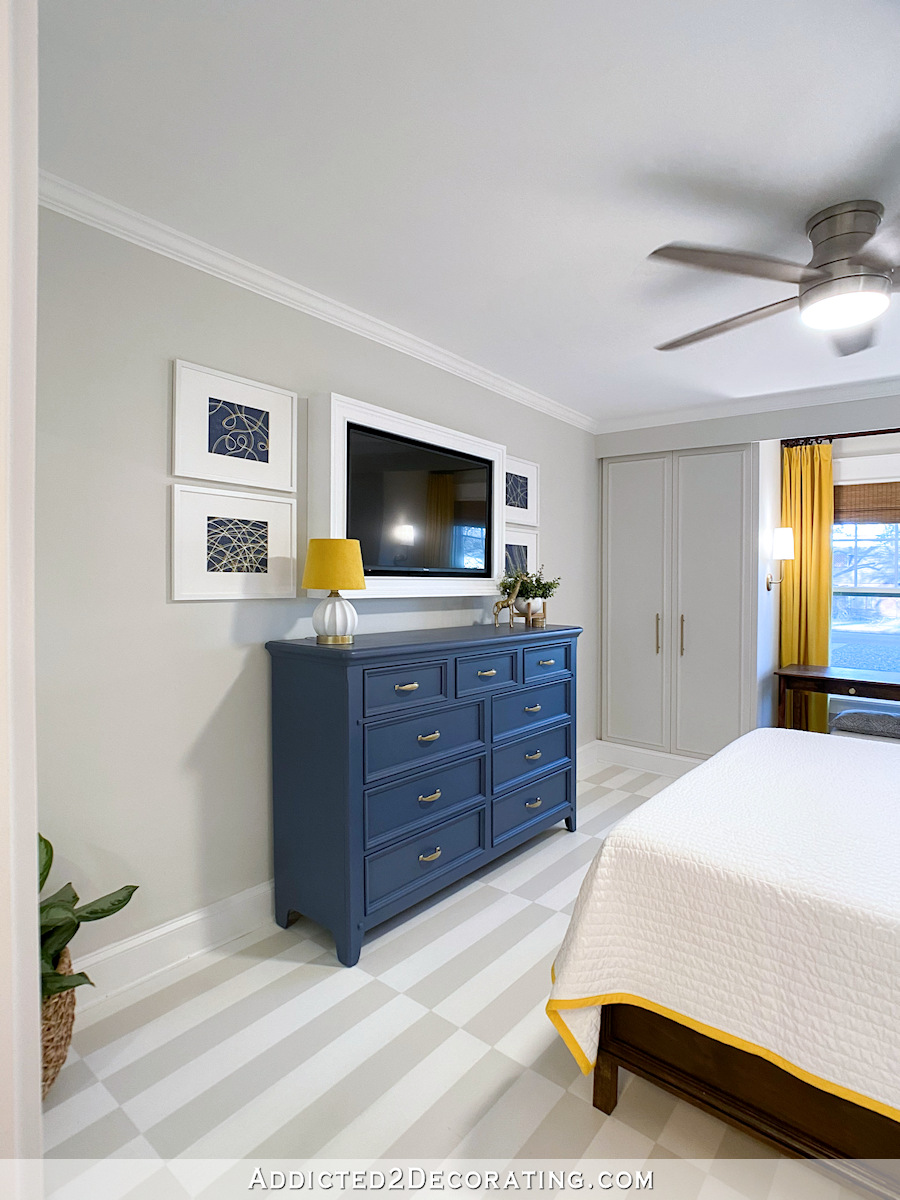
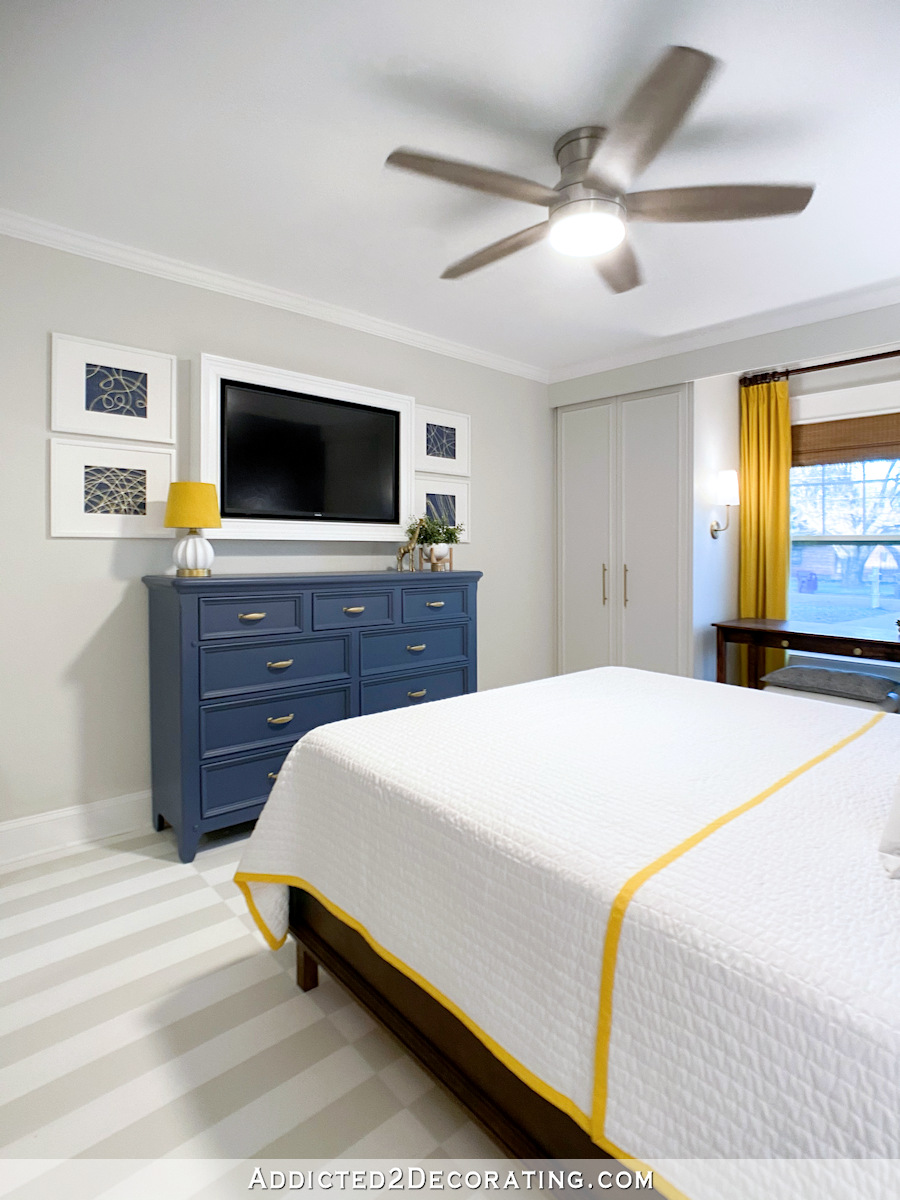
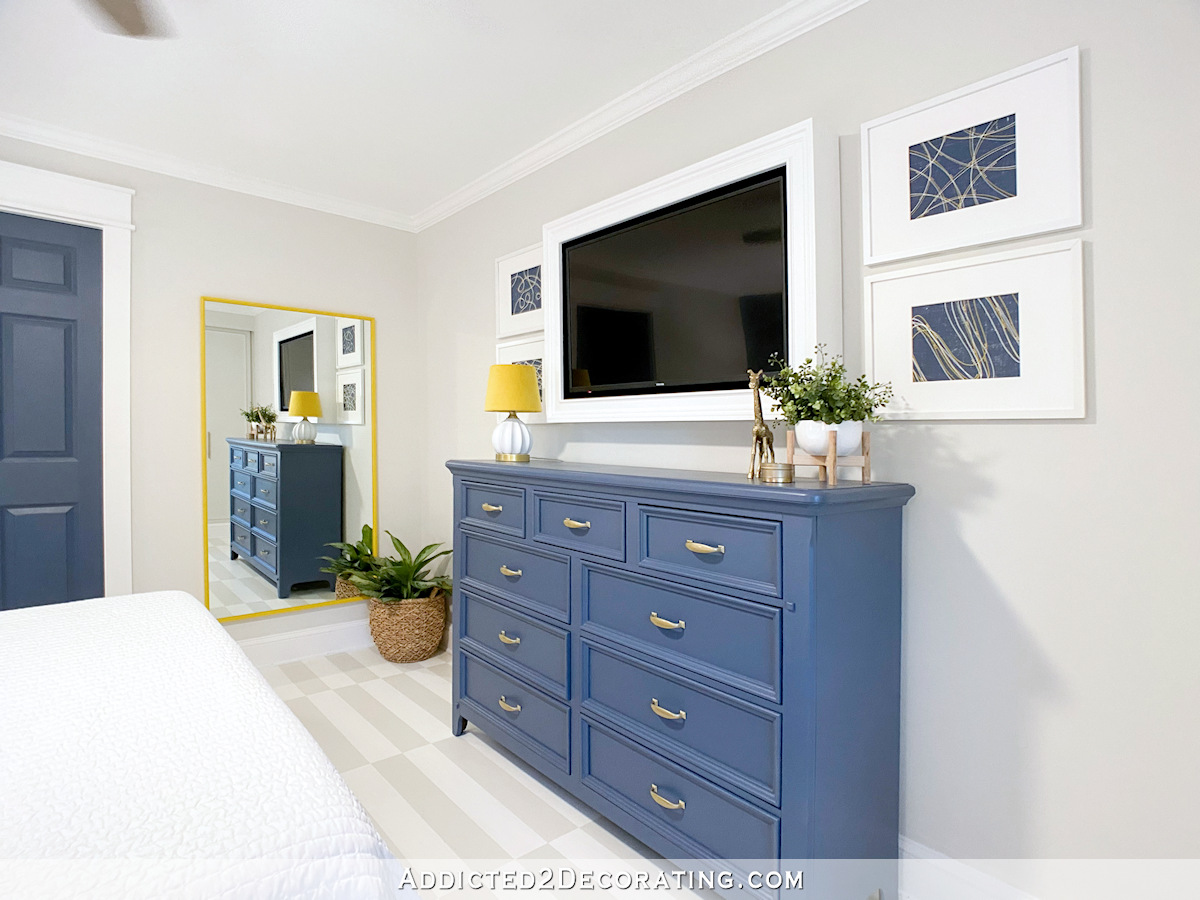
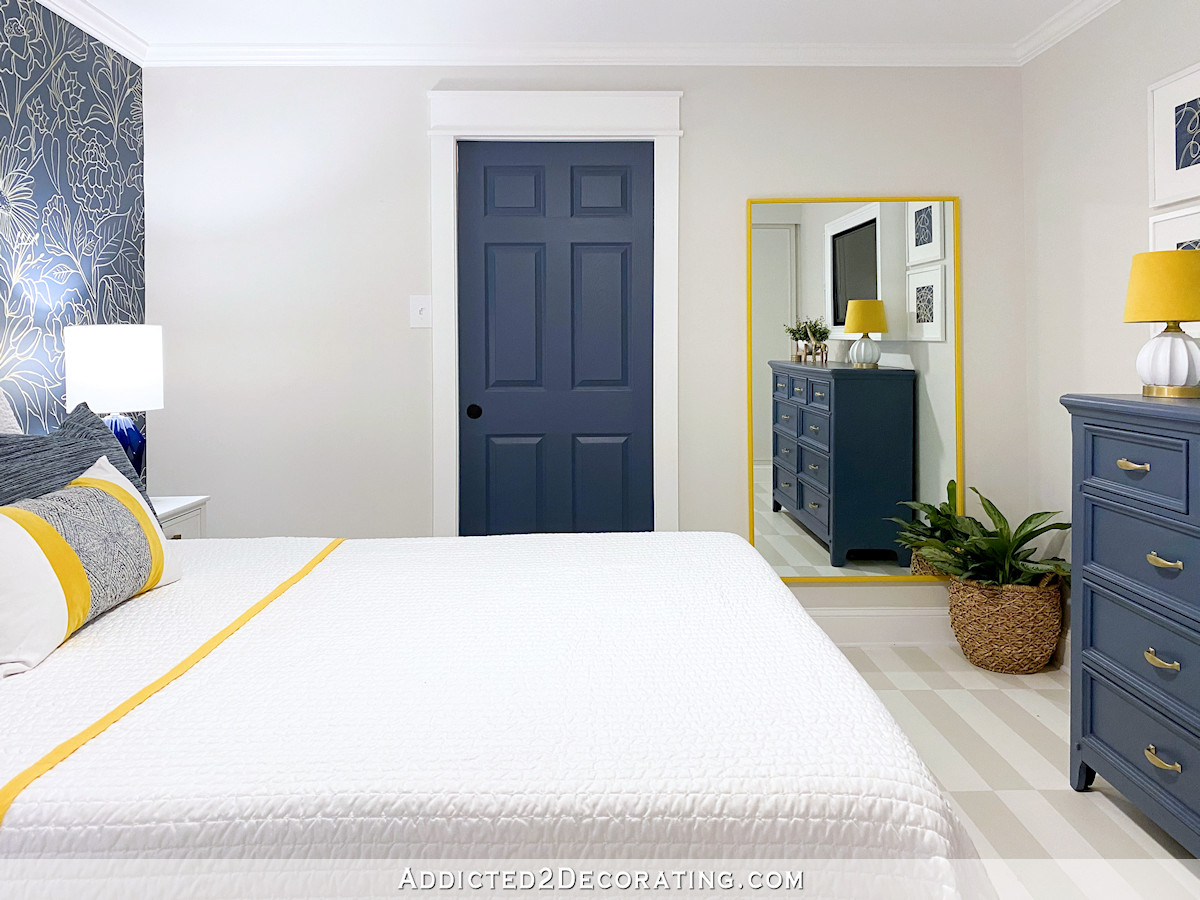
Opposite the feature headboard wall is the dresser and TV…
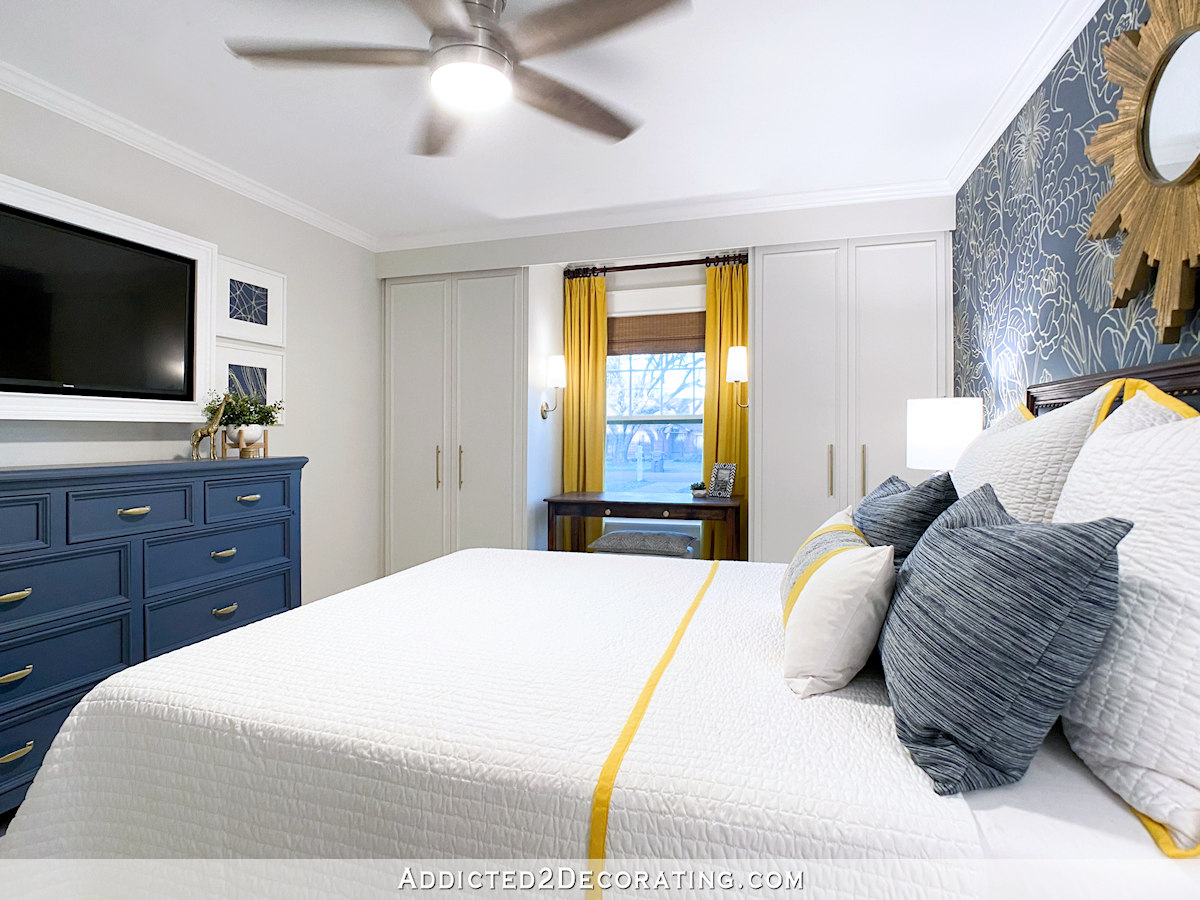
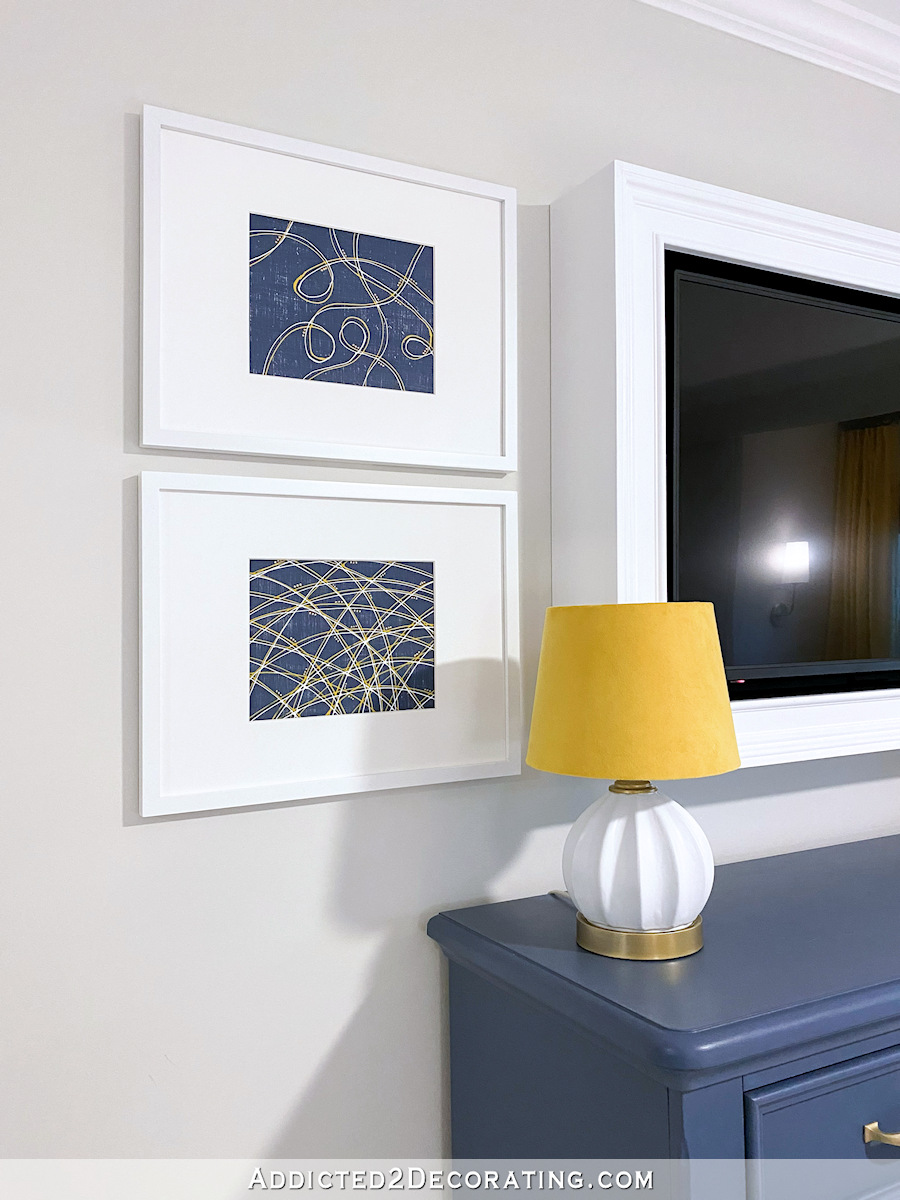
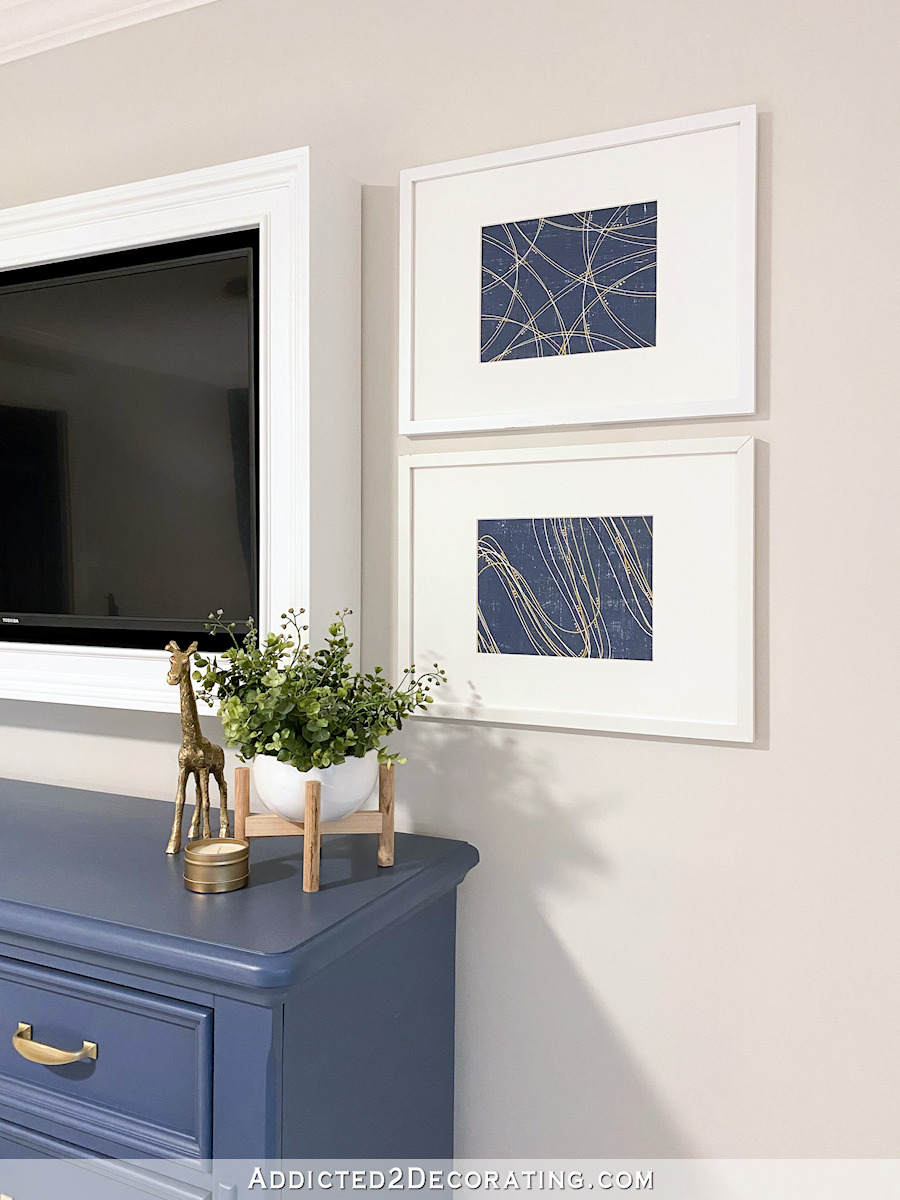
The dresser was originally a dark stained wood, so I painted it the same color as the feature wall. You can click here to see that before and after dresser painting project. Then I built a frame for the TV, just like I did for the TV in our breakfast room (you can see that DIY project here) and then I made some very easy DIY artwork for that wall. You can find the DIY artwork project here.
Here’s a close up of the artwork on the left side of the TV…
And the artwork to the right of the TV…
The full-length mirror is one that I purchased at a local glass and mirror shop, and then I built a very simple frame for it. I had a yellow paint sample custom matched to the drapery fabric color to use on the frame. You can click here to see the DIY framed full-length mirror project.
Before the room was re-drywalled, I had the guys replace the swinging bedroom door with a pocket door. I’ve really grown to love pocket doors. They’re just so convenient, and much easier for Matt to use. And when they’re open, they’re out of sight and don’t take up any additional space.
I trim all of my doors and windows the same very simple and easy way that does not require any mitered cuts. The sides are 1″ x 4″ lumber, and the top header is created with a 1″ x 6″ and two pieces of 1″ x 2″ lumber. You can click here to see details of how I trim out my doors and windows.
And just for reference, here’s how that side of the room looked when we bought the house in 2013…
The closet that you see on the left side in the original bedroom is obviously not there anymore. When the room was being drywalled, I had them drywall over that doorway, and then open up that closet to the bedroom on the other side of that wall. That’s the room that will eventually be our home gym, and with this guest bedroom’s original closet closed up on this side and opened up to that room, and then combined with the original closet that was in that other room, that opened up closet space in the future home gym now looks like this…
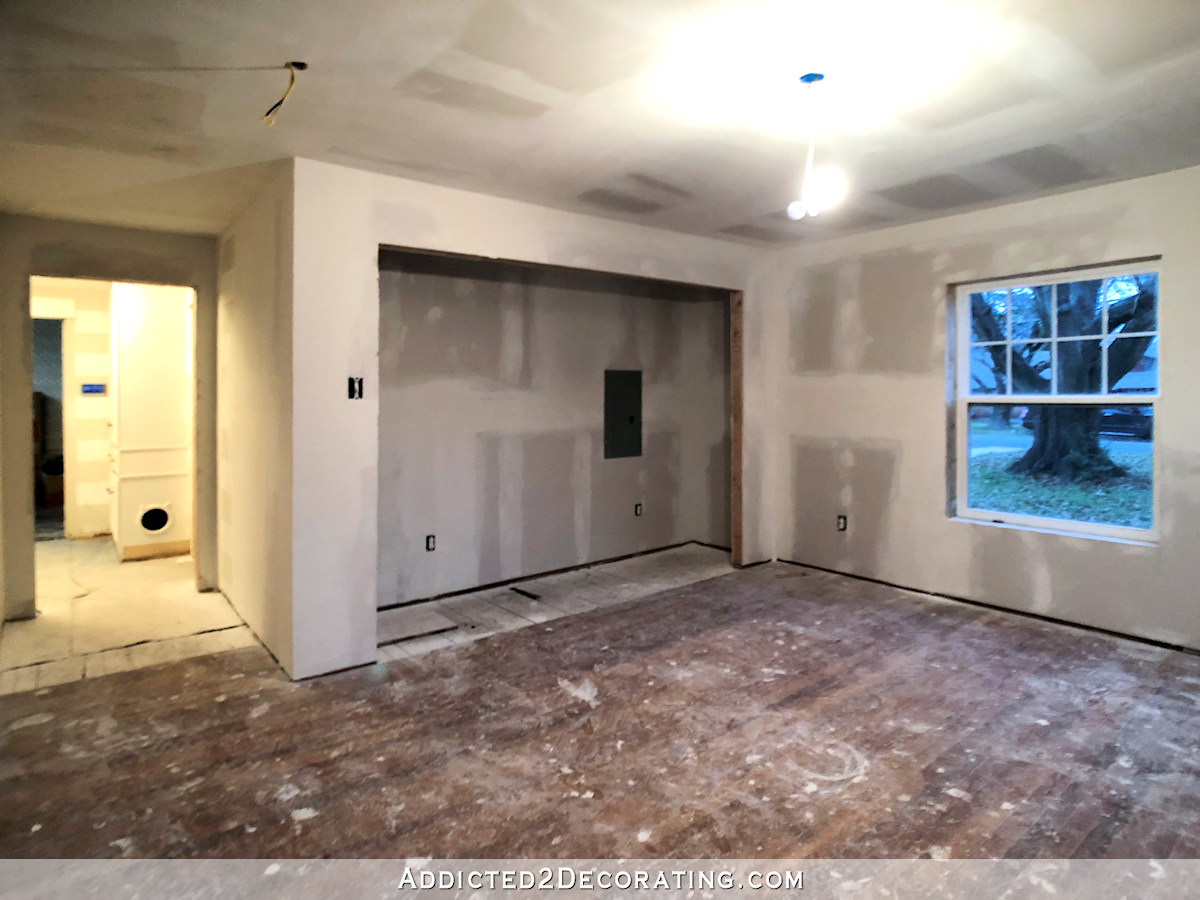
So the left side of that area used to be the closet for the guest bedroom. It was closed up on the side visible in the picture above, and was accessible through that little door in the original guest bedroom. And the right side of that area was the original closet for this side, which is the room that will eventually be the home gym.
It was because I closed up the original closet in the guest bedroom that I needed to build the closets flanking the window. I hope all of that makes sense. 😀
Anyway, back to the pretty and finished stuff. The bed is one that I built years ago for the original master bedroom in this house — a room that I never got around to actually decorating, and now has been torn apart completely to become the new master bathroom. I was very glad to be able to repurpose the bed in this bedroom. You can click here to see the details on how I built the bed frame, and you can click here to see the DIY upholstered headboard that I made to go with it.
Side note: That cat is Felicity. She’s the one that came to us from my sister, and for two years, she stayed to herself. She almost never appeared in pictures, because she seemed afraid of us, and would hide out and avoid us most of the time. But ever since Peeve died, Felicity has completely come out of her shell. She has become so friendly, and she follows me around everywhere.
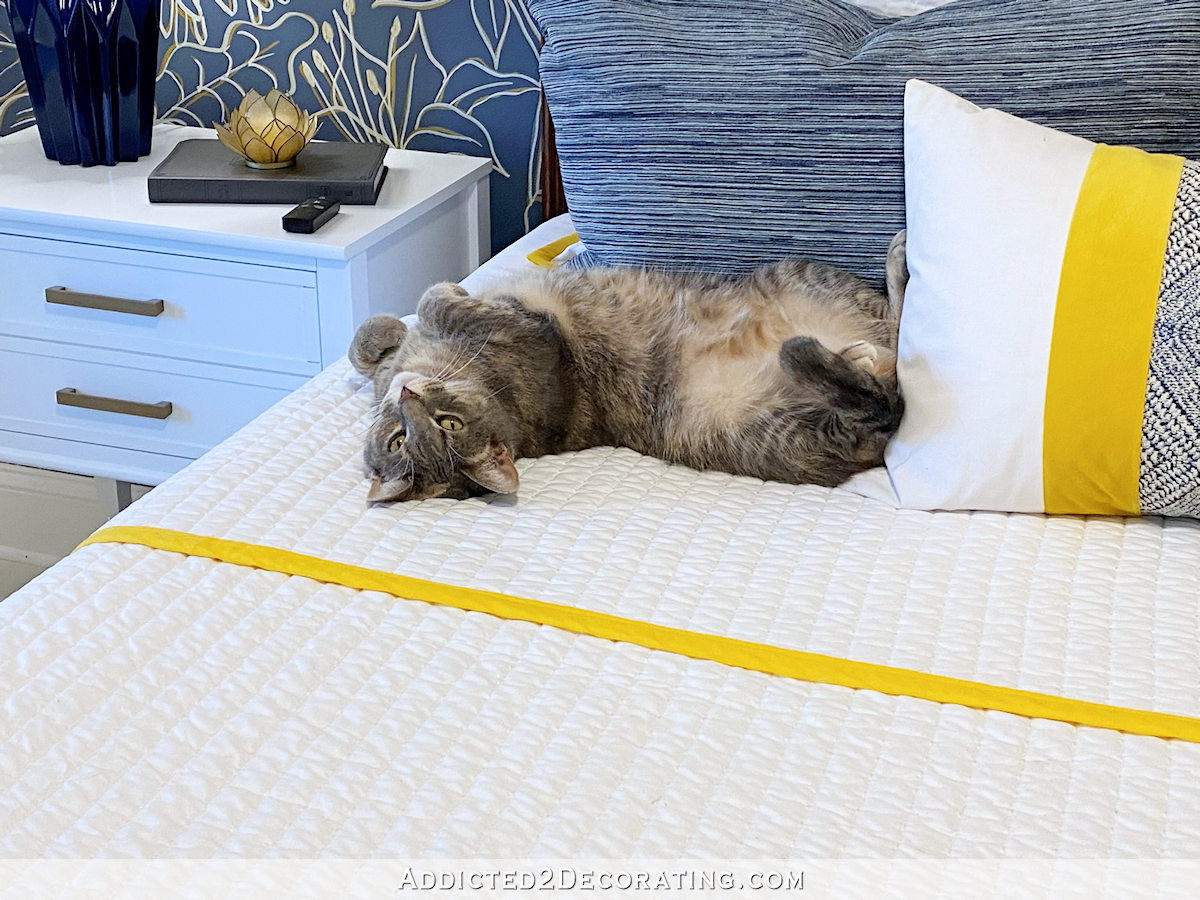
The change in her has been night and day. It’s hard to believe that this is the same cat that hid out in the dark corners of our house for two years and rarely came around us, because now she won’t leave me alone. Chances are that if I’m in a room, she’ll be right there with me. So while I don’t stage her in pictures (is that even possible with a cat?), I’m betting that y’all will be seeing much more of her from now on.

The bedding is a combination of store bought and DIY. I purchased two white quilts on Overstock — a twin and a king. I used the king size as the actual quilt. I cut it to the exact size I wanted, and then added the yellow trim on the edges. Then I used the twin size quilt to make the Euro shams to match. And then I found the two blue fabrics at Joann Fabrics, and added in some leftover drapery fabric on the small accent pillow. You can click here to see the details of the semi-DIY bedding.
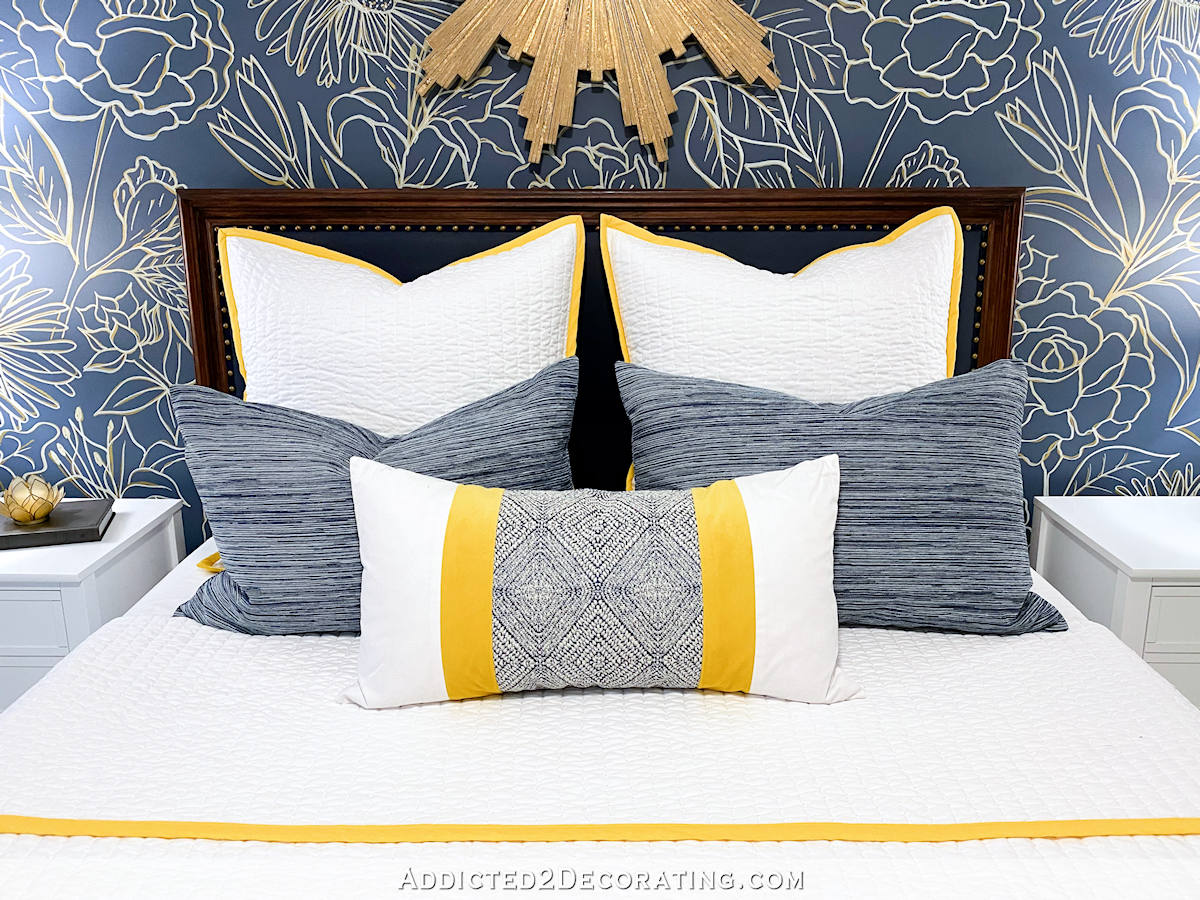
The sunburst mirror is a project that I did years ago. I made it out of wood shims. I was rummaging through my stash of stuff in the sunroom, came across this sunburst mirror, and decided to try it on that wall above the bed. I loved it! It looks like a project I would have made specifically for this room, and yet I made it five years ago. You can click here to see the details of the DIY sunburst mirror project.
So that’s pretty much it! The year-long bedroom project finally came to an end. 😀 Here’s a quick commentary-free walk through from beginning to end…

It’s a small bedroom, but a pretty big transformation. 🙂 Here are a few more details…
Paint Colors


Products & Projects
You can click here to see more sources for our home.
Source link