This website may contain affiliate links and advertising so that we can provide recipes to you. Read my privacy policy.

Homemade pasta is a labor of love but it is totally worth the extra work! This pasta is simple and easy, it just takes a bit of time.
Pasta is favorite comfort food for many. Try these tried and true favorite pasta dishes, California Spaghetti, Creamy Chicken Florentine, and Easy Pasta Primavera.

Homemade Pasta Recipe
Homemade pasta is way better than boxed pasta, it has a good chew and texture that you can’t get from the store. With only 5 ingredients it really is easy to make. The hardest part is waiting for it to rest before you run it through your pasta maker. I always shied away from making homemade pasta thinking it was way too hard. I couldn’t have been more wrong. Using a pasta maker takes all the hard work of rolling it out. Although you can make this using a hand roller and I tell you how below. Seriously homemade pasta is one of the best things you will ever try this year!
There are many recipes out there and opinions on how to make pasta perfectly. This recipe is it! Pasta is very forgiving and there are many amazing ways to make it. This is a classic recipe that includes Olive oil for flavor and the much-needed salt for taste. Some recipes just add salt to the cooking water, but you are going to want to add it to the pasta dough for the best flavor. These are the best noodles you will ever make. Toss them with a bit of olive oil and cheese if you want or throw them in your favorite sauce for a dinner you won’t soon forget!
Pasta Dough Ingredients
Simple ingredients come together in a special way to make amazing pasta. With just 5 ingredients you probably already have everything you need on hand. So what are you waiting for? You have to try this easy recipe today!
- Flour: All-purpose flour works perfectly or semola flour works too.
- Eggs: Eggs should be at room temperature to mix in fully.
- Olive Oil: This is used in Italian cooking regularly.
- Salt: Gives the pasta flavor.
- Water: Need to create the perfect mixture.
How to Make Homemade Pasta
Follow the instructions and you’ll have perfect pasta! Homemade pasta is very forgiving so do not fret too much about it. The most important thing you want to concentrate on is the consistency when you knead the dough and letting it rest. Those are very important for creating homemade pasta that is divine.
- Flour: On a clean surface, place the flour in a mound and use your hands to form a nest in the center. Add the eggs, olive oil, salt and water to the center of the nest.
- Add Eggs: Use a fork to gently break the yolks of the eggs and slowly stir the center of the nest incorporating a little of the flour walls at a time until a dough has formed. Use your hands to finish working all the flour in.
- Create Dough: Knead the dough for about 8-10 minutes. It’s a stiff, dry dough but it will come together into a smooth dough. Once the dough has all come together and is smooth, wrap in plastic wrap and set it in the fridge to rest for an hour. You can leave it overnight if you wish, but be sure to get it come to room temp before rolling out.
Creating the Pasta Dough
You want to keep the sections you are not using right away covered so that they do not dry out. If you do not have a pasta maker, see below for instructions on how to roll out pasta by hand.
- Cut and Roll: Cut the dough into four pieces and use your hands to shape the first section into a small flat oval. Wrap the remaining three sections in plastic wrap until you are ready to roll them out.
- Pasta Maker: Feed the oval piece of dough through the pasta maker on the number 1 setting. Fold the pasta into book folds, which is the two end folded in until they touch in the middle and then folded in half. Run through the pasta maker on setting 1 two or three more times before moving through the next settings on your pasta maker until the pasta is the desired thickness (I prefer setting 6 on my pasta maker.) If the dough is becoming tacky or sticky dust it with a little bit of flour. Additionally, if the dough is becoming much too long to handle you can cut it in half and work each half separately.
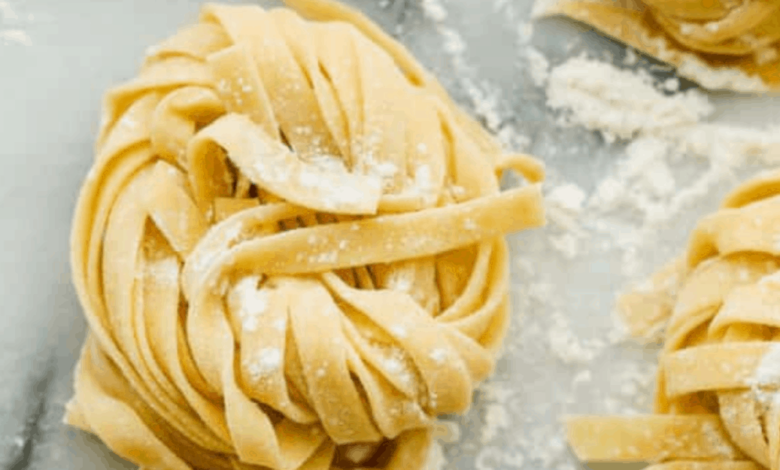
- Make Noodles: Run the dough through the pasta maker using the cutting attachment to cut the shape of noodles you would like. Dust the final noodles with flour and either hang on a pasta rack or make them into pasta nests and let them rest for about 30 minutes on a floured surface.
- Cook Noodles: Bring a large pot of salted water to a boil. Boil the pasta for 60-90 seconds. Toss with your favorite sauce and enjoy!

Preparing the Dough
I prefer to do this by hand, but you can make the dough in a stand mixer or food processor. If you make it in a food processor you will need to remove it and knead by hand. Once the dough comes together you can use a dough hook to knead the dough in a stand mixer.
- Large Nest: Make the well in the flour large enough to hold the eggs, water, oil and salt.
- Mix: Use a fork to mix the eggs thouroughly in the nest and then slowlly start bringing in the flour using the fork to start. Once a a bit of dough forms switch to your hands.
- Work it: Knead the dough till your dough is smooth and taunt. It takes a long time to work the dough into the right consistency so be patient and don’t give up. You really have to work the gluten in the dough. Do not leave it shaggy and sticky.
- Let it rest: This is one of the most important steps. Wrap the dough in plastic wrap and let it rest for at least 30 minutes. This relaxes the the protien so it will roll out and easily. If you do not let it rest you’ll be fighting it the whole time.

Run Dough Through Pasta Maker
Make sure you follow the directions on your pasta maker. Everyone is a bit different. Keep it floured to prevent sticking.
- Cut and roll: Cut the dough into 4 sections. Work only one section at a time, keeping the other sections covered in plastic wrap.
- Roll first: To make it easier to roll through your pasta roller I like to roll it a bit with a rolling pin into a nice oval shape.
- Flour: If at anytime you feel like the dough is sticking to the roller or surface, sprinkle with flour to keep it loose and easy to work with.

Fold the Dough
This is an essential step so don’t skip folding the dough in the beginning. It will give you the shape you want.
- Fold: After you have passed it through the pasta machine at least once or twice it’s time to start folding it. Folding the dough creates a rectangle and makes it easier to cut and keeps it even. Fold it a couple of times to get the right shape.
- How to Fold: Take each end of the dough and fold it into the center so that the ends meet in the middle. Fold the dough over itself, folding it in half. This will create a nice rectangle. You may need to fold it a couple of times as you pass it through the biggest setting to get it to the right shape.
- Too Long: If your dough starts to get too long to work with, cut it in half and work with a half, one at a time. Continue rolling till desired thickeness

Using a Pasta Machine
Using a pasta roller is truly a fun thing to do. It is so satisfying to roll the dough and watch it get thinner and thinner. Handle the dough with care as you put it through the roller.
Running it through the Pasta Machine: Rolling the dough is a process. You have to start big and gradually move down a size till you get the desired thickness. Start with the biggest setting, run the dough through once or twice then adjust the settings to be thinner, and thinner until you have the perfect sheet of golden pasta.

Flatten the Pasta
There are different attachments for the kitchen aid which can cut your dough into different shapes. Most pasta makers will only cut your dough into long thin strips. But those can be used for recipes still that cause for small pasta like Baked Rigatoni or Creamy Tuscan Pasta.
- Flatten: If you need to, remember you can fold the dough again to get the dough into a good shape.
- Cut: Once the dough has reached the desired thickness, run the dough through the pasta cutter for the desired shape of your noodles. Make spaghetti sized noodles for recipes such as Cacio e Pepe, or Creamy Bacon Carbonara. Use a bigger cut for dishes such as Fettucini Alfredo or Pesto. Depending on your pasta maker you can make any shape you want with this dough. Again flour the dough as needed to keep it from sticking together as you run it through the cutter. You want to dust the dough, not work the flour into it.

Making Homemade Pasta
Nesting your noodles will keep them from drying out too quickly and allow you to quickly grab them and place them in the boiling water. Salt your water for the best results.
- Nest: Gather the noodles and nest them while you work with the next section of noodles. Dust with flour as needed to keep them from sticking together.
- Boil: Bring a large pot of water and some salt to a rolling boil. Add the pasta and cook for 60-90 seconds. These homemade noodles will cooks so much faster than boxed dried pasta so keep an eye on it.

Tips For The Best Homemade Pasta
Homemade pasta truly is easy, it just takes some time. Your family is going to love the taste and texture of homemade noodles. You may never buy boxed pasta again.
- What Flour should you use: There are definite opinions out there on what makes the best noodles. You can get gorgeous, delicious noodles by using all-purpose flour. To get a more authentic texture you can use a combination of all-purpose and semolina flour. Some might say you need “00” flour but you do not have to go buy expensive flour to get wonderful noodles.
- Mixing and Kneading: You can definitely knead it by hand, but you can also use stand mixer with a dough hook. Just knead it till the dough is smooth and elastic.
- Flour and Nest: When forming nests of pasta noodles, be sure to flour the noodles well so they don’t stick together as they rest. You can shake the noodles loose before dropping them in the water, or you can place the whole nest in the water and break it up as it cooks.
- Reserve Liquid: When your noodles are done cooking reserve some of the pasta water in a measuring cup. Fresh noodles tend to soak up more sauce than dried noodles, so adding a tablespoon of two of starchy pasta water can help invigorate your sauce and keep it from being soaked up too much by the noodles.

No Pasta Maker? No Problem!
If you do not have a pasta roller and cutter do not fret. You can still have amazing homemade noodles that will taste absolutely luscious in any dish. They just may be a bit puffier, but every bit is as good! You can add them to soups at the end of cooking right before serving. Try them in Chicken noodles, Tomato Basil, or Minestrone.
- Divide: Once the dough has rested. Go ahead and cut the dough into quarters so it is easier to work with.
- Roll: Roll a section at a time on a lightly floured surface. Coat the rolling pin with flour to keep it from sticking. Dust with flour as needed. Roll the dough till it is 1/8″ inch thick.
- Cut: Using a pizza cutter or a sharp knife, cut the sheet into four sections. Lightly dust the dough. Roll the sectioned dough into a roll. Cut the roll using the knife or pizza cutter into the desired thickness. You can skip rolling it and just cut the dough as well, but I find it a bit easier and faster to roll it before cutting it.

Drying and Storing Homemade Pasta
Homemade pasta is versatile and storable. I love making a double batch so we can have some now and some later. Perfect for a busy weekday or a lazy weekend. Cook up some Marinara and toss with your pasta for an easy dinner add meatballs for a bit of protein.
- Dry: Use a pasta drying rack or clean hangers for drying pasta. Place cut pasta dusted with flour in a single layer over the rack or hangers and let them dry for 24 hours. Carefully remove pasta from drying rack and store in an airtight container or jar until ready to use. You can keep in the fridge if you desire. Dry pasta will hold for up to 1 month if stored in a cool, dry place.
- Freeze: Arrange freshly made, uncooked pasta across a floured baking sheet. For long noodles arrange into nests. For short pastas keep in a single layer. Freeze for a couple of hours, and then transfer to double layer plastic bags. You can freeze for up to a couple of months. And you can cook straight from the freezer. No need to thaw, just dump the pasta into boiling salted water, and increase the cooking time a bit.

-
On a clean surface, place the flour in a mound and use your hands to form a next in the center. Add the eggs, olive oil, salt and water to the center of the nest.
-
Use a fork to gently break the yolks of the eggs and slowly stir the center of the nest incorporating a little of the flour walls at a time until a dough has formed. Use your hands to finish working all the flour in.
-
Knead the dough for about 8-10 minutes. It’s a stiff, dry dough but it will come together into a smooth dough. Once the dough has all come together and is smooth, wrap in plastic wrap and set it in the fridge to rest for an hour. You can leave it overnight if you wish, but be sure to get it come to room temp before rolling out.
-
Cut the dough into four pieces and use your hands to shape the first section into a small flat oval. Wrap the remaining three sections in plastic wrap until you are ready to roll them out.
-
Feed the oval piece of dough through the pasta maker on the number 1 setting. Fold the pasta into book folds, which is the two end folded in until they touch in the middle and then folded in half. Run through the pasta maker on setting 1 two or three more times before moving through the next settings on your pasta maker until the pasta is the desired thickness (I prefer setting 6 on my pasta maker.) If the dough is becoming tacky or sticky dust it with a little bit of flour. Additionally, if the dough is becoming much too long to handle you can cut it in half and work each half separately.
-
Run the dough through the pasta maker using the cutting attachment to cut the shape of noodles you would like. Dust the final noodles with flour and either hang on a pasta rack or make them into pasta nests and let them rest for about 30 minutes on a floured surface.
-
Bring a large pot of salted water to a boil. Boil the pasta for 60-90 seconds. Toss with your favorite sauce and enjoy!
When your noodles are done cooking reserve some of the pasta water in a measuring cup. Fresh noodles tend to soak up more sauce than dried noodles, so adding a tablespoon of two of starchy pasta water can help invigorate your sauce and keep it from being soaked up too much by the noodles.
Serves: 6
Calories208kcal (10%)Carbohydrates32g (11%)Protein7g (14%)Fat5g (8%)Saturated Fat1g (5%)Polyunsaturated Fat1gMonounsaturated Fat3gTrans Fat1gCholesterol93mg (31%)Sodium327mg (14%)Potassium79mg (2%)Fiber1g (4%)Sugar1g (1%)Vitamin A135IU (3%)Calcium21mg (2%)Iron2mg (11%)
All nutritional information is based on third party calculations and is only an estimate. Each recipe and nutritional value will vary depending on the brands you use, measuring methods and portion sizes per household.