(Pocket-lint) – If you’ve ever seen light painting photos from your friends on Instagram, Facebook, Flickr, or any other social network feed. Or if they’ve managed to shoot an image where a waterfall or river looks cloudy and smooth, the answer is long exposure photography. And it’s actually quite simple, once you know where to find the settings, and have the right equipment.
Now, thanks to the arrival of night mode on so many modern smartphones, you don’t need it for creating great low light shots, but those aforementioned exposure effects that’s not useful at all.
Long exposure on smartphone: What you need
Before you get started with the process of taking long exposure shots on your smartphone there are some essential pieces of kit you should have, because it doesn’t matter how steady your hands are, even the smallest vibration will be enough to ruin the photo. In short, you need something to mount your phone on, to keep it still.
A mount – if you have a tripod already:
A tripod – If you don’t have one already:
A memory card – if you need extra storage space:
Why take long exposures on your smartphone?
For those who look at the phrase “long exposure” and think it’s some photographer jargon, it basically means holding the shutter open for longer than usual. It enables the kinds of effects you can’t get by just pointing and shooting at something, and means you can take better photographs in extremely low light situations.
You can create light trails, cool cloud-like effects shooting moving water, create your own “ghost” photos, or just shoot really great photos of the night sky laden with stars.
Long exposures on smartphone: The method
1. Find your manual mode
A lot of modern Android smartphones now have manual controls built into their camera apps. Whether you go with something from Huawei, OnePlus, Samsung, Sony or others, there are plenty out there already capable of taking a long exposure photograph. Head to your default camera app, look through the camera modes and see if there’s one named “manual” or “pro”.

2. Locate shutter speed
Once manual mode is activated, you’ll see a number of options. The most important to take note of are the ISO and Shutter Speed settings. Shutter Speed is normally indicated using a shutter icon (circle formed of interlocking segments), or an “S”.
Once you tap on the shutter speed icon you’ll get a list of speeds, ranging from fractions of seconds as fast as 1/3200 of a second, all the way up to 30 seconds. Needless to say, the longer the exposure you choose, the more time the sensor is exposed to light.

3. Adjust ISO
This is why it’s also important to adjust the ISO, which defines how sensitive the sensor is to light – it’s a hangover from the days of film.
With a really high ISO, you not only run the risk of over-exposing/having too much light and ending up with a bright white image, with no detail, but also you will increase how much noise appears. For any long exposure, it’s good to take the ISO relatively low. For most of ours we selected one of the two lowest options: 50 or 100.
4. No manual mode? There’s an app for that
If you don’t have a manual mode, either because you have an iPhone or a lower-end Android, there are third party apps available.

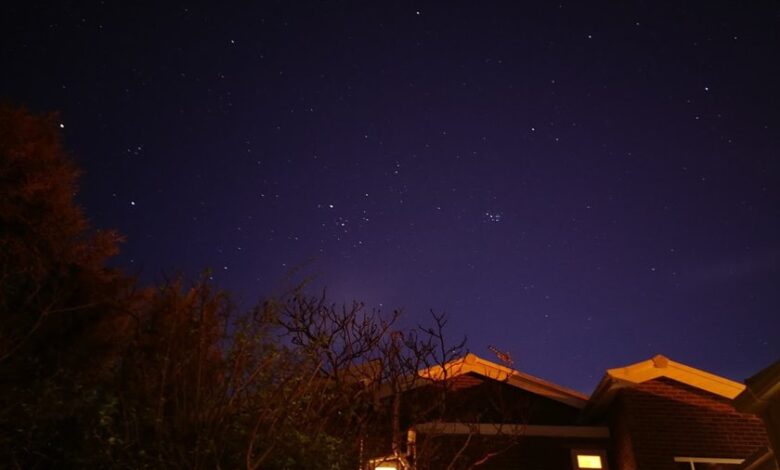
Long exposures: Starry Nights
Taking your tripod, pointing it up to a clear night sky and taking a picture without a long exposure normally means a grainy, noisy picture showing no discernible stars. Set the shutter speed to 20 or 30 seconds, tune down the ISO to its lowest settings and then be amazed as it uncovers stars you can’t even see with your eyes.

Long exposures: Ghosts
The technique for creating ghostly images (ie. semi transparent people) is the same as taking any other long exposure shot. The only difference being that you have to ask your subject to stand still for a few seconds, then get them to move away really quickly out of shot. If your subject is a child, that latter part can be a challenge.

With the photo above we set up a five second exposure, and got the subject to move away after three seconds. With a slightly slower moving child, as you can see, it creates ghostly, whispie trails which kinda add to the effect.

Long exposures: Light painting and light trails
Using the same combination of long exposure and low ISO, you can point a flashlight towards the camera and use it to paint your name in the air. Some phones, like Huawei phones for instance, have a light painting mode optimised for this, but it can be done manually.
The same technique can be applied to busy roads at night time, which will then give you those red and white light trails with “ghost” cars.

Long exposures: Cloudy/frosty water
Bodies of water, whether they be lakes, the sea, waterfalls, rivers or just running water from a tap can create a really eerie cloudy effect using a long exposure photo. Since it’s transparent, the movement can make the water seem cloudy or milky when a camera shutter is open for a few seconds.
The only tricky part is ensuring light levels aren’t too high. With a 2-3 second exposure you can often end up with a completely bleached image if you take it in the day time, even with the ISO set at 50. So your best bet is heading out at sunset or sunrise, when it’s not completely dark, but just enough light to capture something.
Writing by Cam Bunton.