As all of you know (unless you’re new here), my entire bathroom design has been centered around this beautiful mural of a colorful woodland scene that I purchased and installed to go on the wall where the freestanding bathtub will sit…
So it caused quite a stir when I posted this image of me painting over my beautiful mural on Instagram a couple of days ago.

And yes, I really did cover the whole thing with not just one, but two coats of oil-based primer.
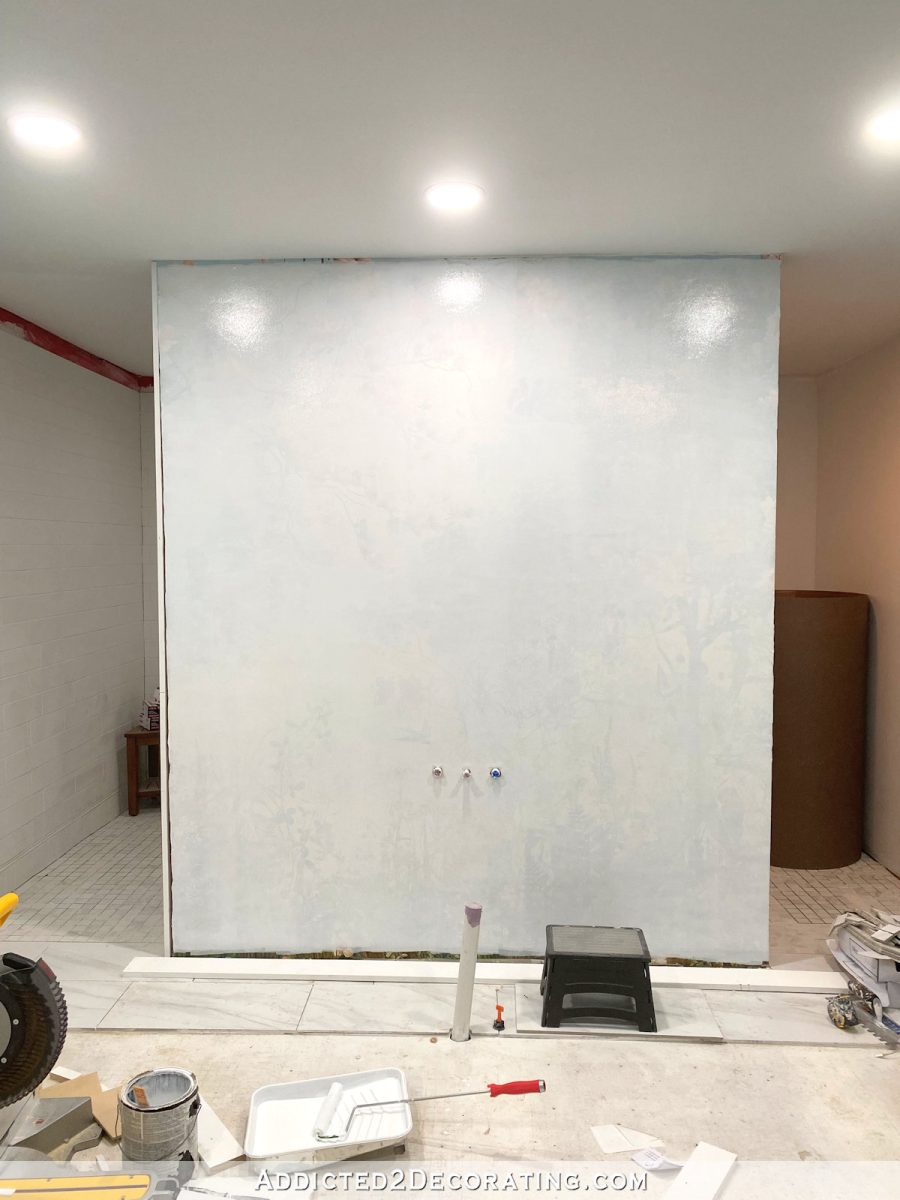
I got quite a few “What the heck?!” responses. 😀 And I said up front that once I was done with this wall (again), the responses would almost all fall into two categories — (1) “I totally understand why you did it. That was a good decision.” Or (2) “That was a whole lot of work for very little benefit.” So you’ll have to let me know which camp you fall into. 🙂
Let me explain to you why I did this. 🙂 I did it because I wanted to reinstall the exact same mural, but this time, I needed to pay more attention to details.
First of all, why didn’t I just install wallpaper over wallpaper? Why the primer?
Well, I held up a piece of the new mural over the old mural, and I could see the old mural design through the new wallpaper in the light areas of the design. Obviously, I didn’t want the old mural showing through. And the reason I used oil-based primer is because I didn’t want to take the chance of the water-based wallpaper paste for the new mural soaking down into the seams of the old mural and lifting the seams. That mural was on there really well, and the seams were lying perfectly flat. I needed them to stay that way so that the new mural could also be perfectly flat on that wall as well without ridges in the seams from the original mural lifting. So I decided to seal the seams with oil-based primer, as well as cover over the old design, all in one step.
And now for the why…
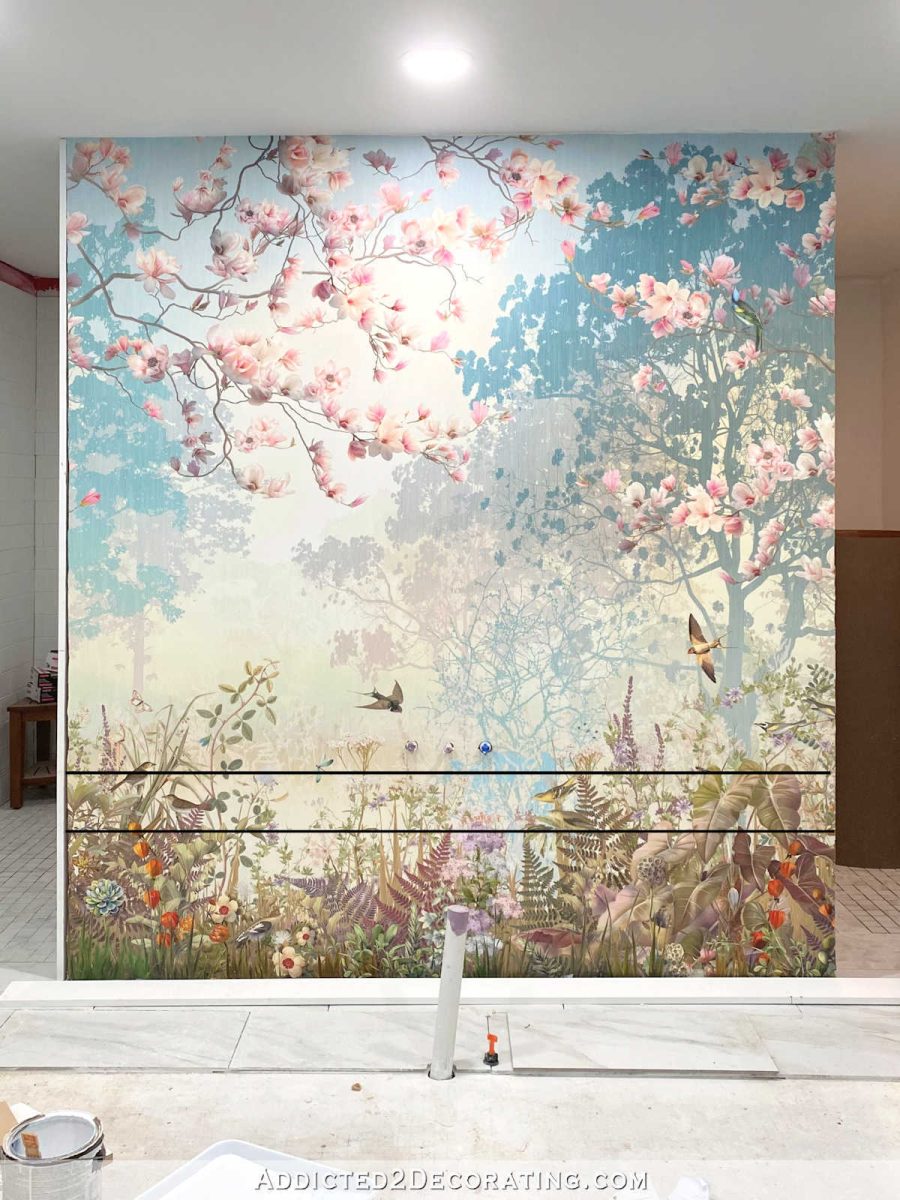
The whole reason I did this is because I installed the original mural too low on the wall, and it bothered me so much that I couldn’t NOT redo it.
I ordered the mural from Photowall, and they suggest that you order the mural with a few extra inches in height and width. That makes perfect sense, so that’s what I did.
The problem is that when I installed the original mural, I lined up the top of the design with the top of the wall, and worked from top to bottom. That also makes sense since that’s how wallpaper is installed — from top to bottom. Right? But the problem is that I was left with a few inches (maybe three inches) of actual printed mural that I cut off of the bottom right next to the floor.
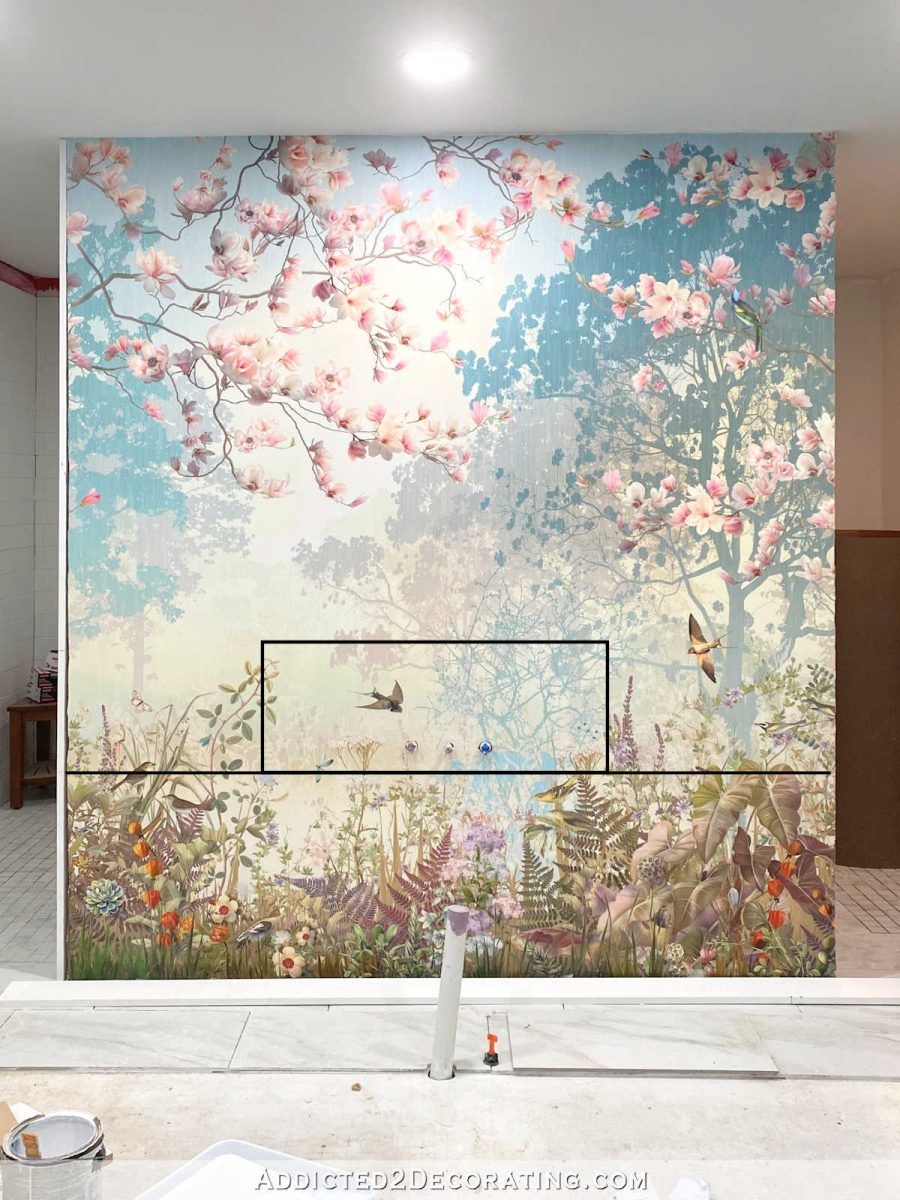
So when I finished the mural, I absolutely loved it. But I was also disappointed at how much of the beautiful design would be covered up by the bathtub at the bottom. I drew a line on this next picture to represent the height of the bathtub.

And while it won’t cover the full 86-inch width of the wall, the bathtub that I have (this is the one I bought) is 67 inches wide. So there will be about 9.5 inches of wall showing on either side, but some of that will have to be covered with trim.
I really wrestled with this decision for a good two weeks. I tried to put it out of my mind, and convince myself that it wasn’t a big deal and I just needed to move on. I tried to tell myself that that $200 would be better spent elsewhere in the room.
But the more I thought about it, the more determined I was to order another mural — the same exact mural in the same exact size — and install it with the design higher on the wall. After all, this bedroom-to-bathroom conversion is a very big and costly project, and I want to get it right. This mural is the centerpiece of the entire design, so it needs to be right. And if I reordered and reinstalled, not only could I regain the few (maybe three) inches of design that I had cut off at the floor, but I could also take into consideration the height of the baseboard and move it up even further to gain a few more inches.
The more I thought about it, the more it seemed like it would definitely be worth the extra time and money to reorder and reinstall.
I figured that I could gain about seven to nine inches of that lower design raised above the height of the bathtub. And while that didn’t seem like much, there’s really quite a lot of detail in those seven to nine inches of mural. There are four birds, some pretty foliage, half of a dragonfly, and so much more. You can see the details that I would gain between the lines on the picture below…
Another thing that bothered me about the original mural was the center section where the tub filler would go. There was virtually no foliage showing above the tub line at all. There were just a couple of wisps, but it was mostly sky and trees.
So I decided to go for it. I paid the $197 for a second mural, and this time I marked where the baseboards would go, and I installed the first piece from the bottom up. It really wasn’t as difficult as I thought it would be, and then after that first piece was in place, I was able to install the rest from the top down by lining up the pattern at the top.
Here’s what the new placement looks like…
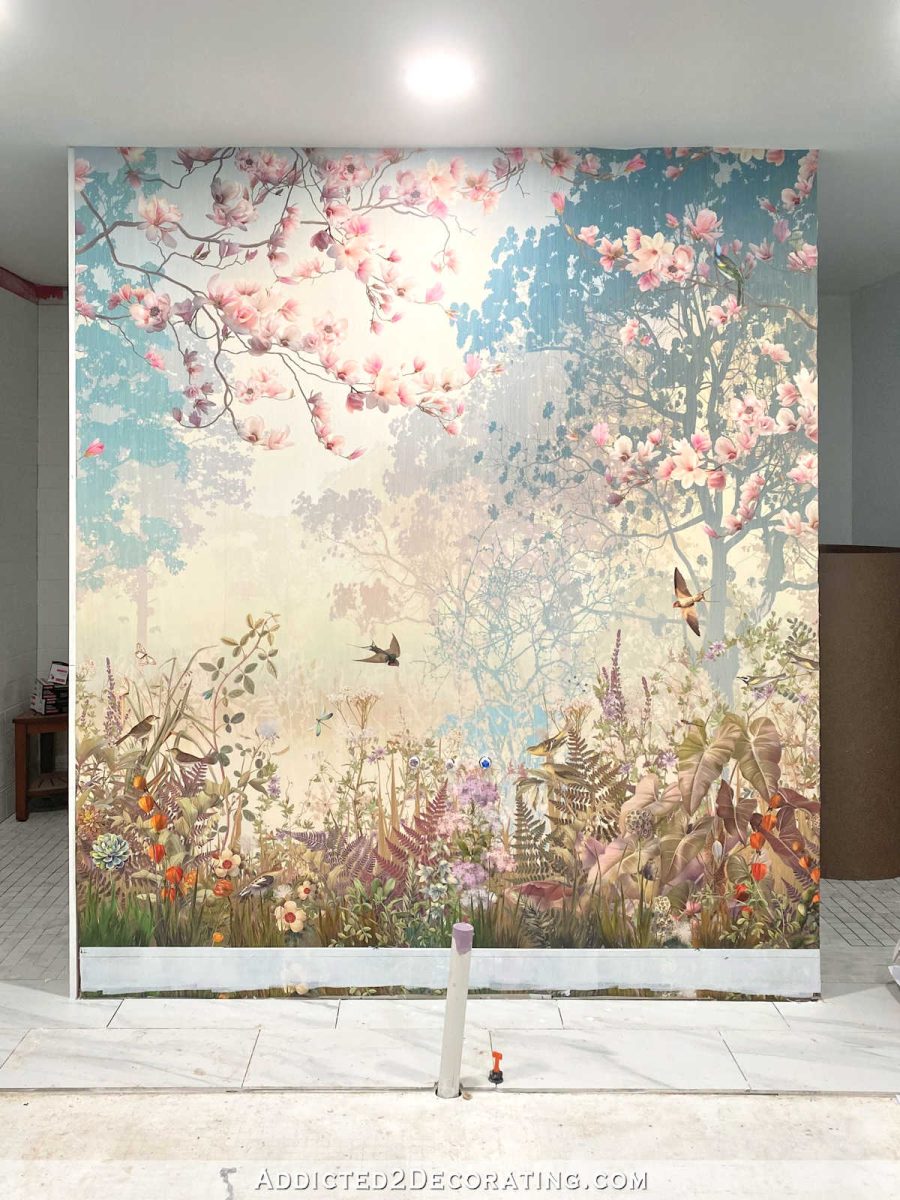
Can you tell a difference? Let me show you with a line representing the height of the bathtub…

See how there’s actually some foliage showing in this center area now?

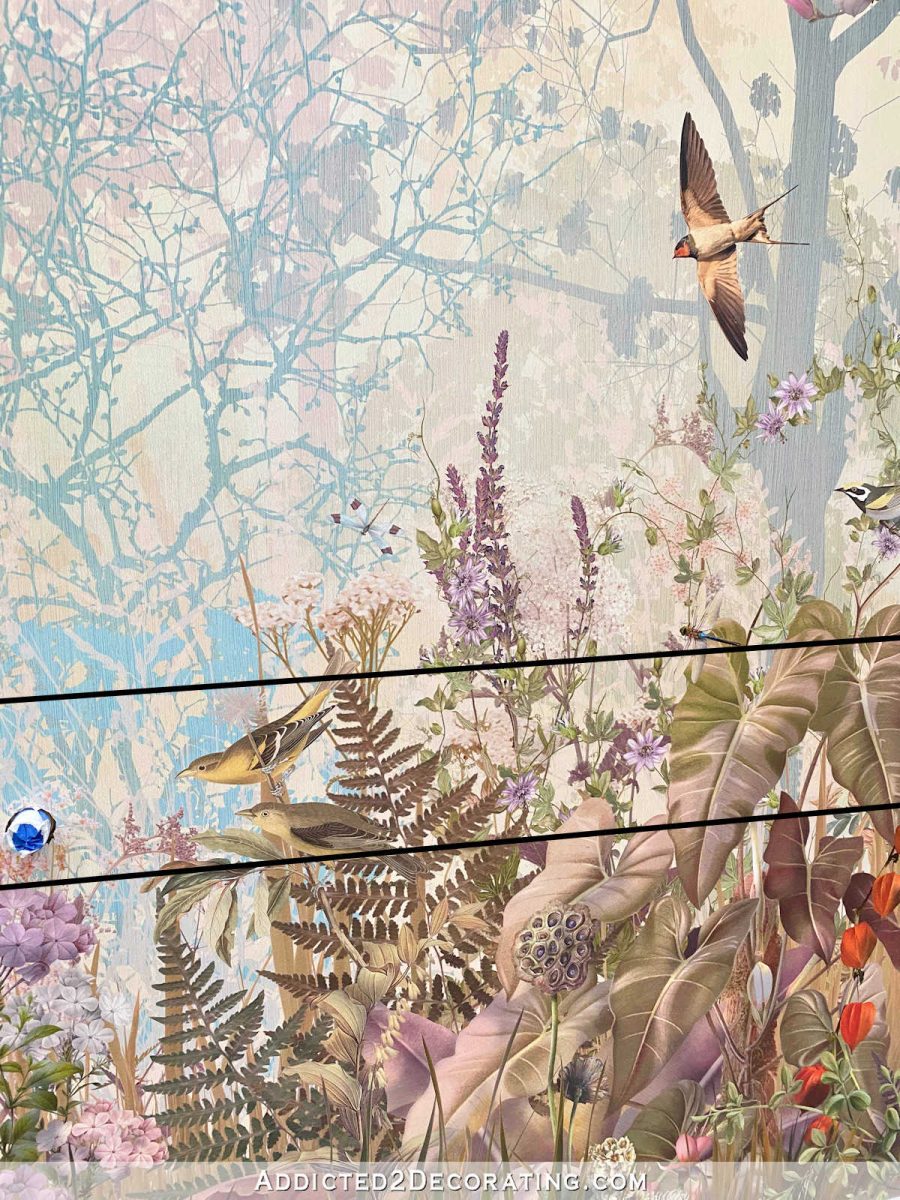
There’s not only foliage in that center section, but there are also two birds that show in that section now. And there are two more birds above the bathtub height on the left side of the mural. Plus, the big leaves on the right side of the mural are now above that line as well.
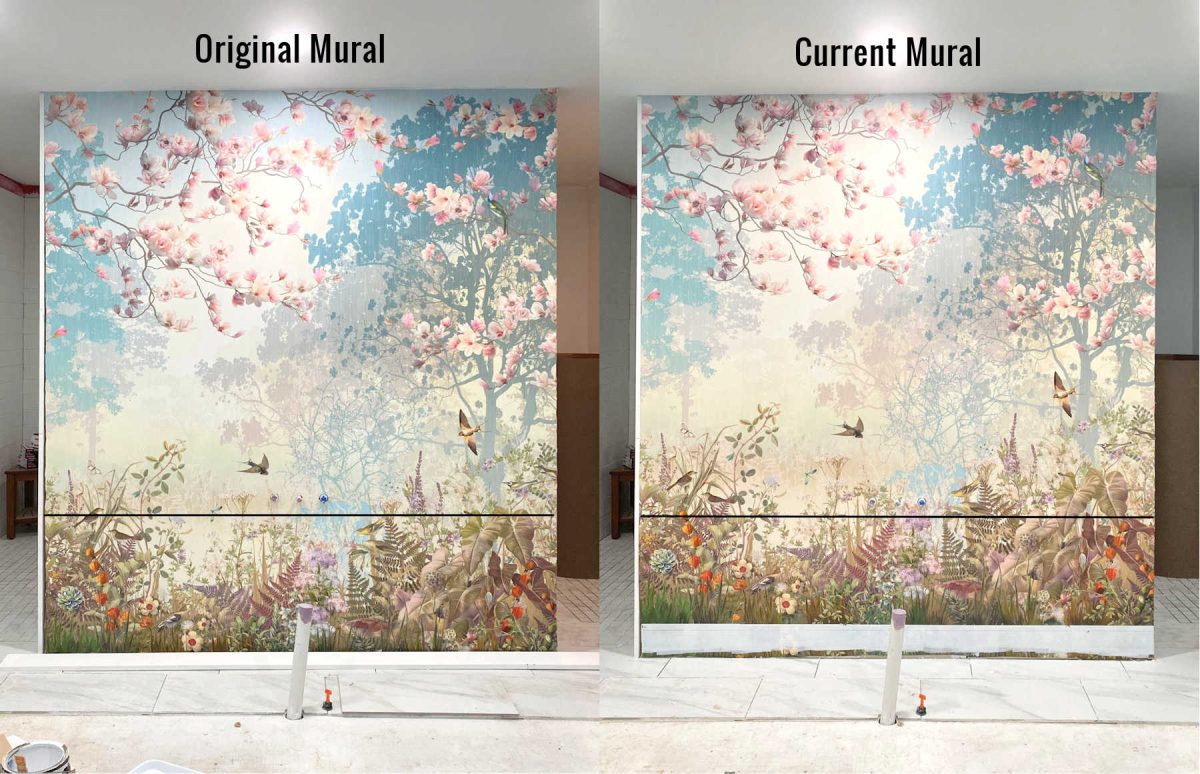
So again, here’s the before…

And now the current mural…
Can you tell the difference? Here’s a side-by-side comparison…
Here are a few closeup views of the detail that I gained above the bathtub height now. Two birds! Plus a pretty purple fern, some other foliage, and a touch of orange.
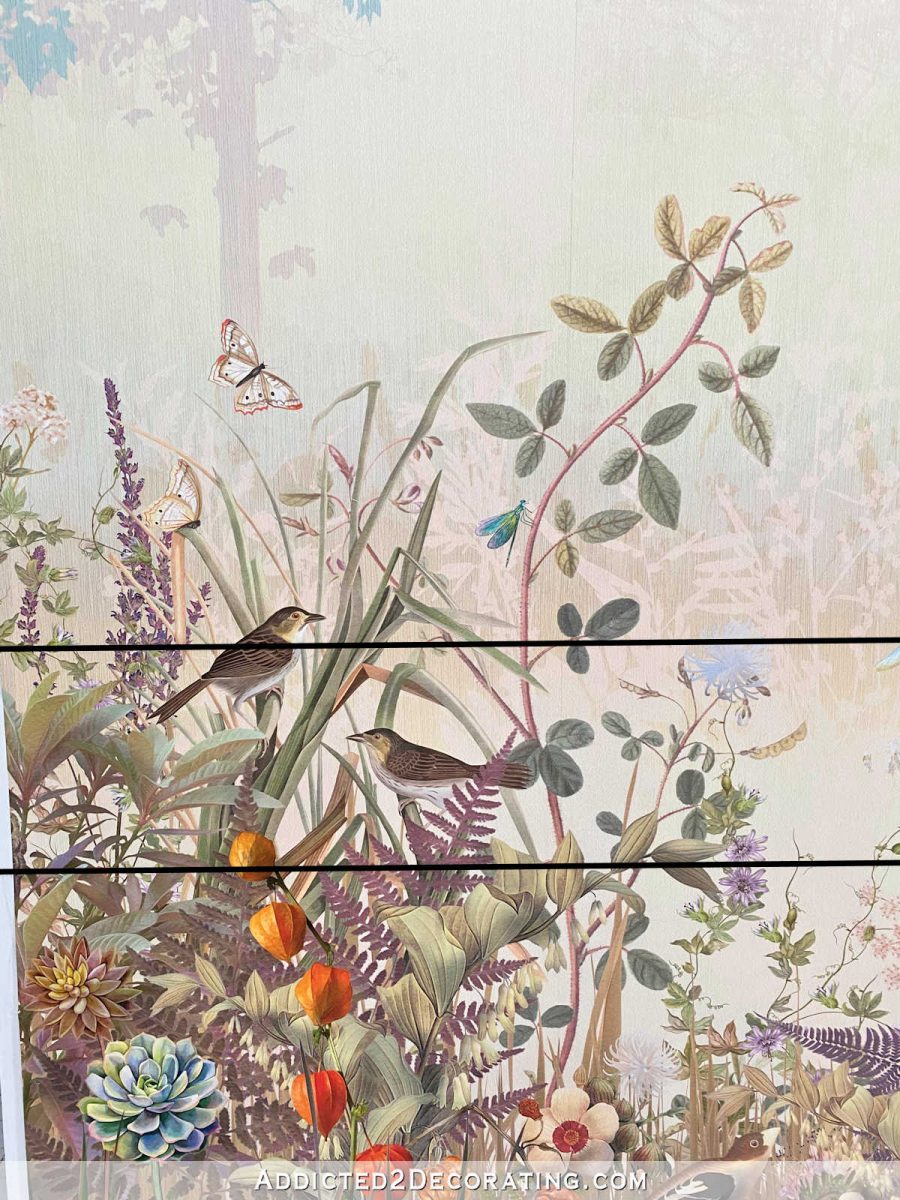
More pretty foliage, and now the whole dragonfly is visible…

Two more birds!! And more pretty foliage, including some purple flowers. I love how the birds are going to look like they’re admiring my beautiful tub filler. 😀

And I’m very glad that those two big leaves on the right are now visible.
So what do you think? Was it worth the extra $197 and the few hours of work? Or was this a whole lot of trouble for very little payoff? I definitely think it was worth the money and the effort. Design is in the details, and this design seems more balanced to me now. And while seven to nine inches doesn’t sound like much, I gained a whole lot of beautiful details above the tub height now. It was definitely worth it to me.

Addicted 2 Decorating is where I share my DIY and decorating journey as I remodel and decorate the 1948 fixer upper that my husband, Matt, and I bought in 2013. Matt has M.S. and is unable to do physical work, so I do the majority of the work on the house by myself. You can learn more about me here.
I hope you’ll join me on my DIY and decorating journey! If you want to follow my projects and progress, you can subscribe below and have each new post delivered to your email inbox. That way you’ll never miss a thing!