Way back when I first started planning the layout of the studio, I intended to build my own cabinets from scratch. Doing so would allow me to make the cabinets and countertop any height I wanted it, so I planned to make a standard 30-inch-high countertop, which is a standard height for tabletops and desktops. So when it came time to install the electrical outlets that would be accessible from the countertop, I installed them at a height that would be perfect for a 30-inch-high countertop.
Well, fast forward a couple of years, and after considering all of the options, I decided to forgo the made-from-scratch cabinets and use IKEA cabinets instead. I liked the idea because they would save me a ton of time. One drawback, though, was that IKEA cabinets are 30 inches high. They’re intended to be kitchen cabinets, and kitchen countertops are generally 36 inches high. So when you purchase IKEA cabinets, the cabinet boxes themselves are 30 inches high, and then you’re supposed to purchase their feet that screw onto the bottom of the cabinet boxes, and then you add the countertop of your choice to the top. That generally puts the finished countertop at about 36 inches high.
Well, I didn’t have room for 36-inch-high cabinets since I had designed the room for standard desktop height countertops. It’s no big deal. I don’t have to use the IKEA cabinet legs. I can make my own base and make it the perfect height that I need in order for the countertop to come just below the window sills. That wasn’t a problem.
But the challenge I knew I’d face was the outlets. There are six desktop-height outlets and one desktop-height light switch on this wall. In order to make the taller IKEA cabinets work, I’d need to move all of those up about three inches so that they are above the window sill height.
So earlier this week, I found a handyman who said he could do the job (both move the outlets and then repair the drywall). He came early Monday to look at the job and give me an estimate, and then scheduled to come Tuesday morning to do the work.
Well, to make a very long story short, I started having doubts. First, I decided that I didn’t like the idea of having the outlets moved up. I already don’t have a whole lot of wall space on this wall for my mural, and I didn’t like the idea of what little wall space I have being cluttered by all of these outlets and a switch. So I decided that I wanted them moved down instead of up.
And then I started wondering if there was even going to be enough wire in the wall to move the outlets at all. So I took two of the outlets off to see how much extra wire was in there, and as it turns out, there wasn’t enough wire in any of these outlets to move them up or down.
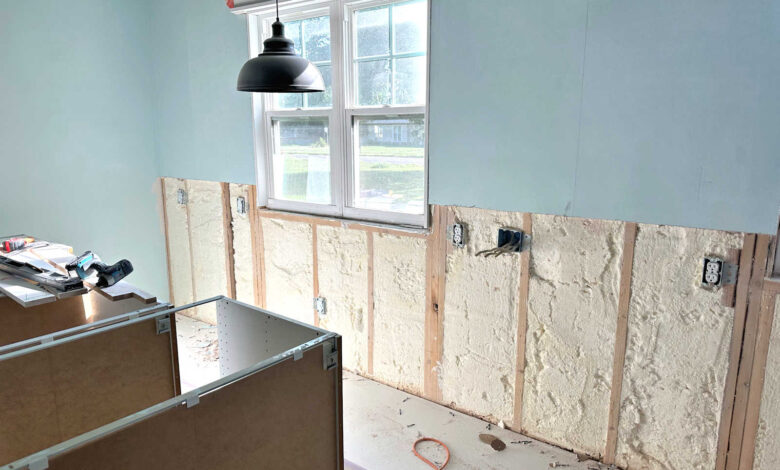
I tugged on the wires a little to see if they had any slack to them at all, and that’s when I remembered that this room has spray foam insulation in the walls. It’s the only room in the house that has spray foam insulation in the walls, and it was sprayed after the electrical wires were run in the whole room. And that spray foam really grabs onto and encapsulates the wires, so there’s really no way to fish wires through walls that are filled with spray foam insulation like you can with interior walls that are just empty space between the drywall.
So after spending way to long racking my brain and trying to come up with any solution for fishing new wire through the foam insulation-filled walls, I finally decided that the easiest solution would be to remove the drywall from the outlets down, move the outlets where they need to go (I’m moving them down instead of up), and then put up new drywall.

In order to do that, I had to remove some of the window casings, but I’m okay with that. It’ll make installing the new mural so much easier without those casings in the way, and since I saved all of the pieces, reinstalling them will be really easy.
So now with the drywall gone, I have complete freedom to put outlets wherever I want them, and as I run the new, longer wires between the outlet boxes, I can carve out neat, precise little channels in the spray foam insulation so that it stays intact as much as possible. And if needed, I can fill in any areas with canned spray foam before putting up the new drywall.

It’s definitely not what I had planned. I had hoped that I’d be installing the new mural today, but obviously, that has to be pushed back a couple of days while this gets finished. It’s not just the long wall that needs to be redone. I’ll have to repeat this process on the other cabinet wall in the “office” corner of the room, where I’ll have to cut out this section of drywall…

So some of you are probably wondering how I’m going to plug things in easily if I’m moving all of the outlets down, behind the lower cabinets, instead of up above the countertop. I’m going to make the outlets easily accessible and usable by purchasing several of these countertop grommet outlets.

Those are installed right on the countertop. I’ll drill a 3-inch hole in the countertop wherever I want outlets, and then the grommet outlet screws into the countertop and the cord below the desktop plugs into an outlet. So that will give me convenient access to outlets on the desktop while eliminating the need for outlets on the wall above the countertop. I think it’ll work perfectly!
It feels like a few steps backwards, but it was necessary. And even with this setback and additional electrical and drywall work needing to be done, it’s still a whole lot easier and less time-consuming that building cabinets from scratch! So it’ll still be a net positive when all is said and done.

Addicted 2 Decorating is where I share my DIY and decorating journey as I remodel and decorate the 1948 fixer upper that my husband, Matt, and I bought in 2013. Matt has M.S. and is unable to do physical work, so I do the majority of the work on the house by myself. You can learn more about me here.
Source link