Elden Ring is hard. That won’t surprise anyone who’s played through a preview FromSoftware game, but even that won’t prepare you properly for all the “You Died” titlescreens you’re bound to see. If you’re going to make it through this adventure, you’ll need powerful weapons. And to get powerful weapons, you’ll need Smithing Stones. Lots of ’em.
Smithing stones are what you use to level up your weapons, be they blades, staffs, shields or spears. To upgrade your weapons, you offer these stones (plus some runes) to Master Blacksmith Hewg at Roundtable Hold. Smithing Stones can be found out in the world and dropped from a few enemies. But to expedite the leveling up process, it’s much easier to just buy them. It’s embarrassing to say, but this is something I only found out I could do about 50 hours into the game. Learn from my mistakes.
To get easiest access to Smithing Stones, you’ll need to collect Bell Bearings. There are nine such Bearings in the game, and this guide contains the locations of all of them.
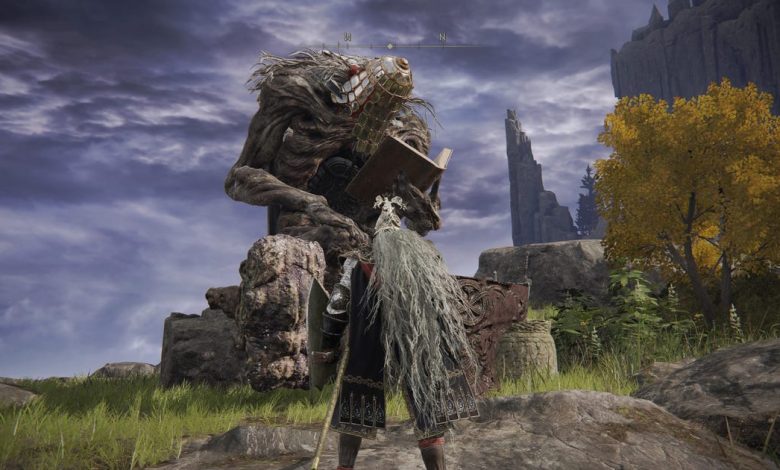
First, the basics. There are two places you can buy smithing stones: From Smithing Master Iji, a giant in northwest Liurnia of the Lakes (pictured above), and also the Twin Maiden Husks at the Roundtable Hold. Iji is more simple, so let’s start with him.
Once you defeat Godrick the Grafted (good luck!), you’ll enter the Land Between’s second major area: Liurnia of the Lakes. To find Iji, you need to travel all the way to the northwest region of the lake. When you come up to shore, you’ll find the Kingsgrave Ruins. There are a bunch of skeleton mages you’ll have to kill (or run past). At the northern part of the ruins is a magic wall that will disappear if you strike it. Do that and you’ll see a Site of Grace to your right. On your left will be Smithing Master Iji.
Iji offers you a unlimited Somber Smithing Stone [1] and [2], plus a finite number of Somber Smithing Stone [3] and [4].
Here’s where you’ll find him on your map.
Bandai Namco/Screenshot by Daniel Van Boom
Iji’s offering of stones.
Bandai Namco/Screenshot by Daniel Van Boom
Iji will get you going and prove a big help, but if you’re serious about upgrading your weapons you’ll need to consult the Twin Maiden Husks at the Roundtable Hold. To get them to sell you Smithing Stones is going to take some work.
To get the Twin Maiden Husks to sell you stones, you’ll to give them Smithing Miner’s Bell Bearings. There are four Smithing Miner’s Bell Bearings, and five Somberstone Miner’s Bell Bearings. If you collect all nine of these, the Twin Maiden Husks will sell you all the Smithing Stones you need to get any weapon up to level nine. Let’s start with the regular Smithing Miner’s Bell Bearings.
Smithing Miner’s Bell Bearing Locations
To start, travel to the Raya Lucaria Crystal Tunnel. It’s also by Liurnia of the Lakes, but on the northeast side. By the shore, where my character is stationed in the screenshot below, you’ll find a little crawlspace that takes you into the Crystal Tunnel. It’s a dungeon that you’ll have to get through — there are a lot of Smithing Stones to collect in there, too. At the end is a boss, Crystalian. Once you beat her, you’ll get the Smithing Miner’s Bell Bearing [1].
Take that to the Twin Maiden Husks and their shop will give you the option of buying an unlimited amount of Smithing Stones [1] and [2].
Raya Lucaria Crystal Tunnel is found here, in northeast Liurnia of the Lakes.
Bandai Namco/screenshot by Daniel Van Boom
The Twin Maiden Husks. You’ll grow to love ’em.
Bandai Namco/Screenshot by Daniel Van Boom
The next one you’ll encounter is the Smithing Miner’s Bell Bearing [2], which you can access as soon as you find Leyndell, the Royal Capital. The bearing isn’t in the Capital, but rather in a small dungeon to the southwest of it. As the map below shows, there’s a dungeon called the Sealed Tunnel, which you can access by travelling through the blue swamp area on the Capital’s outskirts.
The next Smithing Miner’s Bell Bearing is in the Sealed Tunnel.
Bandai Namco/Screenshot by Daniel Van Boom
Thankfully, you won’t have to get all the way through the dungeon to get your treasure. Inside the Sealed Tunnel is an area with a Site of Grace. There’s no obvious way through, but there is a hidden path you can open by striking the wall on the west of the room. Once you do that, you’ll enter a large area filled with enemies. Clear them all out, and you’ll find a treasure chest with the Smithing Miner’s Bell Bearing [2] inside.
Hand over this bearing to the Twin Maiden Husks and they’ll sell you an unlimited quantity of Smithing Stones [3] and [4].
The entrance to the Sealed Tunnel.
Bandai Namco/Screenshot by Daniel Van Boom
While the Sealed Tunnel is a little out of the way, the Smithing Miner’s Bell Bearing [3] is right on the beaten path. The only issue is that getting on that path will take dozens of hours.
To find the bearing, you need to make it to the Mountaintops of the Giants. Getting there involves some story sequences I won’t spoil. But once you get there, you’ll quickly stumble on the Zamor Ruins.
Where you’ll find Smithing Miner’s Bell Bearing [3].
Bandai Namco/Screenshot by Daniel Van Boom
Success!
Bandai Namco/Screenshot by Daniel Van Boom
Like all of the Ruins in Elden Ring, there’s a staircase in the Zamor Ruins that will take you to an underground area. Go down the stairs, open the door and inside you’ll find a chest with Smithing Miner’s Bell Bearing [3]. This bearing will allow you to buy Smithing Stone [5] and [6] of the Twin Maiden Husks.
It’s the same story for Smithing Miner’s Bell Bearing [4], which allows you to buy Smithing Stone [7] and [8] from the Twin Maiden Husks. You can’t avoid this Bell Bearing, as you claim it after beating the Godskin Duo, a tandem boss fight that’s part of the main story. You’ll battle them at Crumbling Farum Azula, the area unlocked after Mountaintops of the Giants.
Somberstone Miner’s Bell Bearings
Many of the weapons you acquire will require a different type of Smithing Stone to upgrade, the elusive Somber Smithing Stones. Like the normal type, these are found in the wild, but Somberstone Miner’s Bell Bearings make them buyable via the Twin Maiden Husks.
Bandai Namco/Screenshot by Daniel Van Boom
The Somberstone Miner’s Bell Bearing [1] is something you’ll have to dungeoncrawl for. You’ll find it at the Sellia Crystal Tunnel in Caelid, the location for which you can see in the screencap above. At the end of the dungeon you’ll battle the Fallingstar Beast. Defeat it and you’ll claim the Bell Bearing, which lets you buy Somber Smithing Stone [1] and [2].
You’re not done with dungeons, unfortunately, as the next Bell Bearing requires you to go underground once again. Somberstone Miner’s Bell Bearing [2] is gained at the conclusion of the Atlus Tunnel. The Atlus Tunnel is slightly hard to find — the easiest way to access it is to travel to the Minor Erdtee near the Forest-Spanning Greatbridge Site of Grace and then travel south.
The easiest way to find the Atlus Tunnel is to travel to this Minor Erdtree and then move south. You can see the Atlus Tunnel on the south part of the map here.
Bandai Namco/Screenshot by Daniel Van Boom
It’s a brief dungeon that will take you under 10 minutes to complete, though the tandem boss battle at the end can be tricky if you’re not levelled up enough. Beat the two Crystalian creatures, though, and you get the Bell Bearing. Give it to the Twin Maiden Husks and they’ll sell you Somber Smithing Stone [3] and [4].
To gain Twin Maiden Husk access to Somber Smithing Stone [5] and [6] you’ll need to offer them Smithing Miner’s Bell Bearing [3]. To find it, you’ll have to track down the First Church of Marika in the western part of the Mountaintops of the Giants. As you traverse through the Mountaintops you’ll find a big frozen lake with a big freezing dragon, which is a sign that you’re near. Travel to the southern tip of this frozen lake and you’ll find the First Church of Marika. Outside is a corpse you can loot for the Smithing Miner’s Bell Bearing [3].
Loot this corpse for Smithing Miner’s Bell Bearing [4].
Bandai Namco/Screenshot by Daniel Van Boom
The First Church of Marika is here, the southern tip of this frozen lake.
To get Somberstone Miner’s Bell Bearing [4], you’ll have to progress to the Crumbling Farum Azula area, which as noted follows the Mountaintops of the Giants. As you progress through this area, you’ll find the Tempest-Facing Balcony Site of Grace. If you walk forward from this Site of Grace, you’ll see a slumped over corpse holding an item. Pick it up to get the Bell Bearing, which gets you access to Somber Smithing Stone [7] and [8].
The Tempest-Facing Balcony’s Site of Grace is where you’ll find the next Bell Bearing. There’s a corpse a few steps forward which you can loot to get your, well, loot.
Bandai Namco/Screenshot by Daniel Van Boom
Start at the Dragon Temple Rooftop Site of Grace for the final Bell Bearing.
Bandai Namco/Screenshot by Daniel Van Boom
At the end of the area you’ll stumble upon this ambush. That wolf goblin creature is standing in front of a corpse which is holding Somberstone Miner’s Bell Bearing [5].
Bandai Namco/Screenshot by Daniel Van Boom
The last boss of bell bearings is Somberstone Miner’s Bell Bearing [5], which lets you buy Somber Smithing Stone [9] from the Twin Maiden Husks. This one is also in Crumbling Farum Azula, and thankfully it’s almost impossible to miss.
As you progress through Crumbling Farum Azula, you’ll find the Dragon Temple Rooftop Site of Grace. It’s a stressful area here: You’ll be attacked by those annoying birds with swords for feet as a dragon in the distance showers red lightning onto the path. Run along the path and when you’re facing off with the dragon, run to the right. This will take you up to an area filled with wolfish creatures that carry big axes. Kill them or run by, and you’ll run across a fallen temple that acts as a bridge between two cliffs. Kill the archer that tries to pick you off as you’re traversing the temple bridge.
Here you’ll see a little chapel, where you’re given a view of one of the wolf creatures standing at the end of a hallway, as you can see in the screenshot above. This is an ambush, of course, as there are enemies on either side that you’ll have to slash your way through. Once you’re done doing that, you’ll see a corpse by that coffin which you can loot to find the Somberstone Miner’s Bell Bearing [5].
Source link