[ad_1]
When I mentioned last week that I was considering doing something different on the studio bathroom walls, several people (including my mom) suggested that before I move on to something different, I take a minute and try the black Sharpie marker trick on the current wall design to see if I like it. Do you remember the black Sharpie marker accents I did on the music room wall?
The music room walls are a painted stencil design in the two neutral colors that I use throughout our house — Behr Polar Bear and Benjamin Moore Classic Gray. But when I did the stencil originally, the design just seemed flat to me. It needed something to give it some oomph. So I decided to use a black Sharpie marker and outline parts of the design to give the design some dimension.
Here’s what the painted stencil design looked like originally…
It was pretty, but it just didn’t look like anything special to me. And it very much looked like a stenciled wall. But after adding the black Sharpie marker detail, it went from looking like an obvious stencil to looking like wallpaper. Here’s what it looks like today…

See how the black Sharpie marker added a lot of dimension to the design?
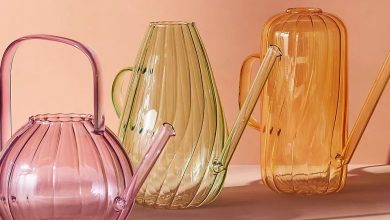
So remembering that, several people thought that I should give that a try on the bathroom walls before I decide to scrap the wall design altogether. Here’s what the wall design looked like before this little experiment. It’s a colorful square spiral design that I taped off and hand painted. It was a very tedious project, for sure!

I don’t regret doing this design at all. I’ve been able to enjoy it for at least a couple of years now, but I’m just wanting something a little more bold and colorful. I know that sounds crazy when you’re looking at this design up close and it looks very bold and colorful…

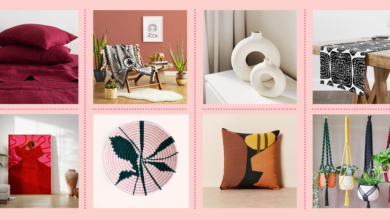
But when you step back and look at it from a distance (or even when standing in the back entry of the studio), the design becomes more faded and loses some of that colorful boldness.
I didn’t really have anything to lose by trying the Sharpie marker accents since I had already decided that I was going to move on to the next idea anyway (probably colorful vertical stripes). So I just picked a spot on the side wall, and went for it.

It’s very hard to tell what impact it will have from such a small sample, but I did like the way it looked with the black accents. And I did like how the black tied in with the new vanity color.

So I kept going so that I could see a larger sample and see if I could get an idea of what impact it would have when done on the whole design on all four walls…

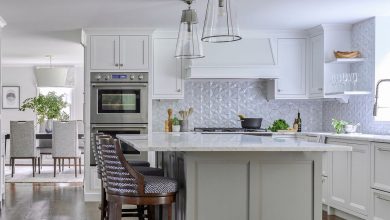
Unlike the music room walls, where there was a very clear and obvious difference between the non-Sharpie parts of the walls and the Sharpie parts of the walls, I wasn’t feeling like this was making a big impact on the bathroom walls. Here’s an “in progress” view of the music room walls. See how huge the impact was on those walls?

I mean, that is a drastic difference! That center part with the black accents almost seems to jump out at you. It looks three-dimensional compared to the rest of the wall.
But on the bathroom walls, the black was getting lost in the design, no doubt because this is a multi-color design, where the music room walls just had two light and neutral colors on them to begin with.


I did go on and do a little big more, but I stopped when I had about half of the side wall done. As hopeful as I was that it would work and make the huge difference in here that it made on my music room walls, I just don’t think it will.

I’m glad I tried it, though! At least now I know for sure. And I do love to experiment with ideas, so I don’t consider this a waste of time at all.

But it seems to me that the key to success with the black Sharpie trick is to start with a stenciled design that is done with neutrals. That’s where you’ll get the most impact, and the most return for your time and effort. That’s not to say that it won’t work at all on a more colorful design, but the impact is going to be lost a bit.

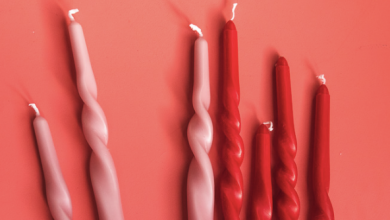
So I’m going to move on to Plan B — vertical stripes. I googled “colorful vertical stripe wallpaper” yesterday, and one of the very first search results really inspired me. It was this wallpaper mural from Photowall.

I don’t plan to use that exact wallpaper. First, the colors are wrong. My mural doesn’t have a lot of yellow. In fact, I’m not sure if it has any at all. And also, I can’t really see myself using “stripes” that are so haphazard. For someone who likes things to be neat, clean, organized (in design, not necessarily in life in general 😀 ), square, straight, and tailored like I do, that’s a bit too “child’s artwork” for me.
But I’m very inspired by the bold colors, and I do like the idea of random width vertical stripes. It’s the colorful boldness of that wallpaper that inspires me, and I can envision it on those walls. I think something colorful and bold like that would look amazing in that tiny studio bathroom!

Addicted 2 Decorating is where I share my DIY and decorating journey as I remodel and decorate the 1948 fixer upper that my husband, Matt, and I bought in 2013. Matt has M.S. and is unable to do physical work, so I do the majority of the work on the house by myself. You can learn more about me here.
[ad_2]
Source link