[ad_1]
I told y’all in a previous post about how a very kind and generous reader offered to print my landscape design plan for me, and she had the capability of printing it HUGE. So I took her up on her very generous offer and had the landscape design printed 52″W x 78″H. I wish y’all could see this thing in person because it is magnificent. But it also presented a dilemma. How in the world was I going to mount and frame a HUGE print like that?
If you’re new around here, this is the landscape design I’m talking about…
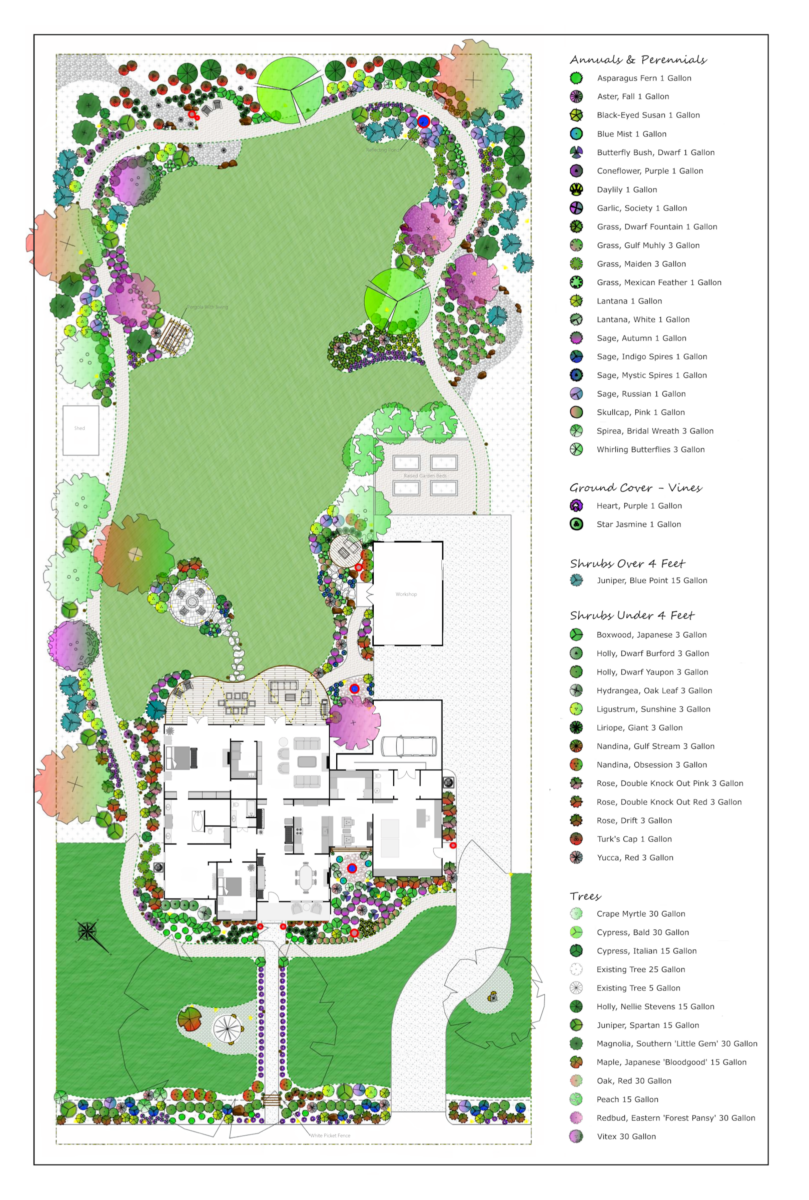
Matt (my husband) had bought that landscape design for me about two years ago. I met with a local landscape designer and told him all of my wishes and vision for our one acre lot, and that’s the design he came up with. I think it’s so pretty, so I’ve been wanting to have it printed and hang it on a wall ever since I saw it the first time.
With the print being so big, I though the easiest thing would be to mount the print on plywood, and then frame it and hang it. Super simple, right? So a couple of days ago, I headed to Home Depot to pick up a piece of plywood for this project, and it wasn’t until I had parked and was getting out of the car that it dawned on me…this thing is 52″ x 78″!! A piece of plywood is only 48″ wide!
So then I had to stop and rethink my plan. What I came up with was a plan to basically build a huge cradle wood panel, which is exactly what I used to mount my little resin petri discs on. It’s basically a frame of wood with a solid piece of plywood or MDF attached to the top to create a wood canvas.

Except that instead of it being a tiny 5″ x 5″, I needed it to be about 150 times that size. 😀
And since I always work alone, another consideration I had to work through was whether or not I’d be able to build this massive cradle wood panel and then mount it on the wall by myself. Since I’m only five feet tall, which means that my arm span from fingertip to fingertip is five feet, I seriously doubted my ability to lift a 52″ x 78″ cradle wood panel off the floor and hoist it onto whatever hanger I decided to use. So instead, I decided to build the cradle wood panel directly on the wall.
I started by using my level, framing square, straight edge (i.e., a piece of extra lumber), and a pencil to mark off the placement of the bottom right corner. I wish that I could have built this just above the baseboard, but as you can see, I had to clear the electrical outlet.

Next, I used a stud finder to mark the placement of the wall studs along the bottom horizontal line.

I cut a piece of 2″ x 2″ lumber to 52″ wide, and then used the wall markings to mark the placement of the studs on the lumber. I pre-drilled screw holes, and then used my largest bit to drill about 1/2-inch into the lumber so that I could countersink my screws, and so that they would be long enough to go into the studs.

I attached that horizontal board to the wall along the marked line using 2.5-inch screws. I used my level to double check that the line was level.

Next, I cut and attached the vertical 2″ x 2″ pieces. I didn’t screw these to the wall, and I didn’t make sure they were in studs. Since the weight of these pieces will be held by the bottom horizontal piece, I only needed to be sure that these pieces were firmly attached to the wall and to the bottom piece. I started by using my nail gun and 2-inch 16-gauge nails to nail through the bottom horizontal piece and into the end of the vertical pieces. I used three nails on each side.

With those pieces attached to each other, I then used my framing square to make sure the vertical pieces were perfectly square with the bottom piece, and then nailed the vertical piece on the right to the wall using those same 2-inch 16-gauge nails.

Next, I attached the top piece. This one was screwed into studs just like the bottom piece, and it was also nailed to the vertical piece just like I did on the bottom corners.

And then finally, I finished up by nailing the left vertical piece to the wall and to the top horizontal piece.

To make sure that the vertical pieces stayed firmly against the wall, I also went back and added nails going diagonally from the inside edge of the wood and into the wall. The purpose of that is to create tension. With the nails going through the front of the wood and straight into the wall, and the nails going diagonally from the inside edge of the wood and into the wall, these vertical pieces won’t pull away from the wall.

And again, the vertical pieces don’t really have to carry weight because the weight is resting on the bottom piece, which is screwed into studs, and the top piece is also screwed into studs so that it won’t pull away from the wall.

For the face of the cradle wood panel, I had to use two pieces of plywood because, again, plywood is only 48 inches wide and this panel is 52 inches wide. So I wanted to add a piece of lumber horizontally where the two pieces of plywood would meet so that I could nail the edges of the plywood to this piece. I didn’t want to purchase another piece for this, so I just used a scrap, which was just a few inches shy of the whole width. That’s not a problem as long as it is also firmly attached to the wall. So I attached it in the same way as the vertical pieces, with nails going directly through the front into the wall, and the nails going diagonally through the top and bottom edges and into the wall.

Then I was ready to attach the first piece of plywood. I started with the little piece so that I could more easily hold it into place while nailing it to the wood frame.

And then I did the bigger piece on top so that I could rest the weight of the bigger piece on the bottom piece while I nailed it into place.

You’ll notice that there’s a gap between the pieces that gets bigger towards the right side. I had checked and double checked my frame to be sure the corners were perfectly square, so when the second piece of plywood didn’t line up perfectly with the frame, I knew the issue was the plywood. So I had to straighten it out around the edges, which created that gap between the two pieces. Things like that can happen (and have happened to me many times) when I let Home Depot or Lowe’s cut my plywood for me.
I wasn’t quite sure what to do about that gap. Would it show through the print? Would it create an unsightly ripple? I got the print out and tacked it to the panel to determine how to proceed.

This paper is super thick, but I could still see a difference in color at that gap. And I do plan to paint the whole panel white before mounting the print, so leaving the gap wasn’t really an option.

So then I had to decide how to fill the gap. Caulk didn’t seem like a good option. I needed something that could be sanded smooth. But wood filler didn’t seem like a reasonable option because the gap was too wide. That much wood filler would not only take forever to dry, but would undoubtedly crack, requiring several coats and many hours of waiting.
The option I thought was the best was to use drywall tape and mud.

So that’s where I left the project. It will probably need at least one more coat of drywall mud after I sand what’s there. (I’m not good at all with drywall mud.) And then I’ll prime and paint the panel, then mount the print, and then frame the whole thing.

Of course, I could have just opted to attach the print directly to the wall, and then use picture frame molding to frame it. I came very close to doing that, but in the end, I just felt like that wouldn’t give the print the prominence it deserves. It would make it look more like wallpaper than a separate piece of framed art. And I think this definitely deserves to be a separate piece of framed art, so making sure that it projects from the wall two inches will make it look like it’s mounted on a gallery wrapped canvas. This print deserves that.

Addicted 2 Decorating is where I share my DIY and decorating journey as I remodel and decorate the 1948 fixer upper that my husband, Matt, and I bought in 2013. Matt has M.S. and is unable to do physical work, so I do the majority of the work on the house by myself. You can learn more about me here.
[ad_2]
Source link