Why You Need a Wildlife Camera
[ad_1]
Whose backyard is it, anyway? When a wildlife camera is on duty, with its heat- or motion-triggered shutter at the ready day and night, the answer can be startling.
Sally Naser calls the animals recorded on the dozens of cameras she monitors for The Trustees of Reservations in Massachusetts “our wildlife neighbors.” At home, in our gardens, we may call them cute — or our herbivorous enemies. But more often than not, we don’t see them.
“There is wildlife all around us, whether you live deep in the woods or on an urban edge,” said Ms. Naser, the conservation restriction stewardship director for the Trustees, the nation’s first preservation and conservation nonprofit, with more than 26,000 public acres and another 20,000-plus private acres under conservation easements. “In back country and in front country, if you want to get this window into the wild, it’s out there for the camera to record.”
In recent years, the quality of wildlife cameras has improved, and prices have dropped. Often referred to as “camera traps” — as their main market has long been hunters wanting to locate that big buck — they have become essential scientific research tools, used to study animal behavior and assess populations, even in terrain as challenging as the rainforest canopy.
In a garden, a simpler setup can answer more straightforward questions: Who’s eating those bush beans? Who’s tunneling under the porch? And what’s going on at the bird feeder when you’re not looking?
“It’s a way to do your own trail-camera bird count,” Ms. Naser said, “and see how many species visit the feeder in a snowy winter month.”
Most of all, a camera (or a couple of them) can increase the sense of awe, the garden’s most delicious yield of all.
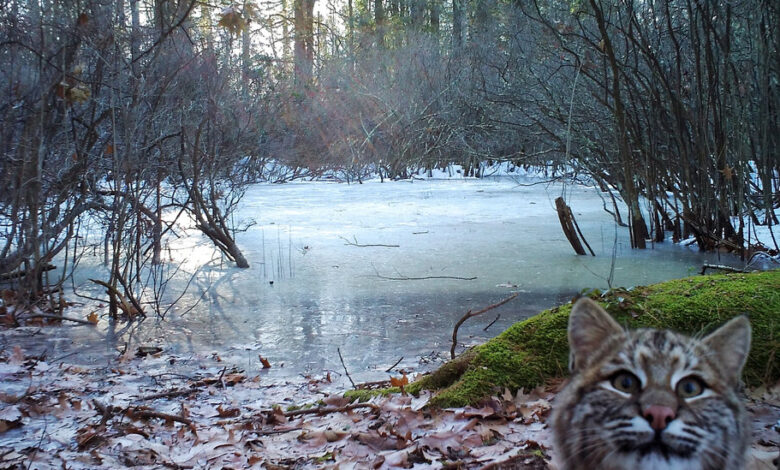
Yes, your backyard photobombers are more likely to be squirrels than bobcats (Ms. Naser’s favorite subject, because of its aloofness and the reaction it evokes in visitors to her CR Wildlife Cams Instagram feed and Facebook page). But you never know, especially when it comes to animals more comfortable moving about after dusk, including the opossum, weasel and fox.
Get ready to be informed and surprised, like the family who spent 40 years in a home before realizing they shared the yard with a bobcat — something they would never have known without Ms. Naser’s camera.
Answer a Couple of Questions
To navigate the daunting choices of camera brands, models and accessories, start with some simple assessments.
First: What’s your target species? Did you see a red fox trot across the yard, or is it the bird feeder you want to spy on?
Subjects close to the camera are better served with an interchangeable micro lens, a feature on some cameras that shortens focus to within three feet.
Or perhaps someone is knocking over that feeder or the trash cans after dark? If you live in an area where black bears are present, you’ll need a metal security box to enclose your camera, like the ones manufactured by CAMLOCKbox.
Second: What’s your budget? For conservation work and for private clients who need help setting up cameras and learning to operate them, Ms. Naser often uses models by Browning, Bushnell and Suspect. She is always seeking out good values, like a previous year’s model of a quality camera discounted when the latest release arrives.
Cameras can cost $500 or more, but for the beginning backyard camera-trapper, it’s not necessary to spend that much.
Likewise, skip the low end. “It’s probably better to spend a little more,” Ms. Naser said, “like $125 to $175 per camera, rather than the $50 models whose results won’t be as satisfying, and that aren’t as durable.”
Camera Features (and Essential Extras)
The serious, testing-based technical reviews on the Trail Cam Pro website make a good starting point for research.
Features like trigger speed — the time from motion detection until a photo is taken — can mean the difference between catching the whole animal or just the tip of a tail. The best cameras have speeds of a half-second or less.
Most cameras offer both still and video settings (with a choice of the number of images or the video length per trigger), but some advanced models have a hybrid mode, recording both with each trigger — although you might miss some action in the stills if a 20-second video is taken first.
If nocturnal visitors are your target, consider various flash types that will yield different results. Infrared flashes — red-glow, low-glow and no-glow (which makes for somewhat grainier photos) — produce black-and-white images. White flashes — more startling to some animals, although they may acclimate, and possibly to human neighbors, too — offer color day and night.
Cameras come with a nylon strap for tying them to a tree or stake, but here’s a tip: “Don’t leave the loose part hanging,” Ms. Naser said. “Tuck it in. A strap blowing in the wind may cause false triggers, or a rodent may chew it off to use as nesting material.”
In your backyard, a cable lock may not be necessary to protect against theft, but Ms. Naser attaches them to all her field cameras.
Don’t skimp on batteries. Ms. Naser uses Energizer lithium or rechargeable Ni-MH (nickel-metal hydride) batteries, not alkaline.
And use a Class 10 SD (secure digital) memory card. Storage of 16 GB holds plenty of shots. Cameras with a built-in color viewing screen allow you to check your setup on site without removing and downloading the card. Another convenience is a special card reader that fits your cellphone or tablet, so you can scroll through images in a larger format.
Location, Location, Location: Camera Setup
Learning about your target animal’s behavior will help you figure out where to put the cameras and how to adjust the settings. Field guides, or a website like Animal Diversity Web from the University of Michigan Museum of Zoology, can be useful.
Water of any kind — even a small backyard water feature — is a magnet for birds and mammals. In wilder areas, beaver dams are among Ms. Naser’s favorite spots for a camera. She calls them “wildlife superhighways.”
Edge habitat — brushy areas where animals can stay close to cover — are also lively. Stone walls are popular with predators, including barred owls; not coincidentally, they are also a favorite hide-out for rodents. A backyard apple tree with fallen fruit or an oak with its acorns are productive autumn locations, inviting everyone from squirrels to deer, blue jays and turkeys.
As for the best height to position the camera, that depends on the target species. Ms. Naser puts it this way, with a laugh: “Knee height or below for most wildlife, and shoulder to head height for moose.”
For the best images and to widen the field of view, position the camera at a 45-degree angle to the target area, and aim it parallel to the ground. A stick can be used as a shim behind the unit.
Point the camera in a northern direction; south is a good second choice. If it’s directed east or west, Ms. Naser explained, “you can get sun triggers at sunset or sunrise.”
Likewise, identify a spot without swaying vegetation — not just branches, but also plants like grasses and ferns. Even a ripple of water can initiate a photo. And remember: You, too, can trigger the camera, so try to avoid high human-traffic areas.
If your photos are out of focus, the camera may be too close to your subject. This is especially unfortunate at night, when the flash turns an animal “into a white, blown-out blob with no detail,” Ms. Naser said.
Cameras placed too low in winter can get buried in snow, but for some small animals, lower is better. Try it, and then tweak: “If all you got was feet,” Ms. Naser said, “raise the camera.”
And don’t just use the default settings, which include slower trigger speed (the time from motion detection until the camera wakes up); fewer images captured per trigger; and a longer photo delay (the time it takes for the camera to get ready for the next trigger).
For fast-moving bird-feeder action or to catch your trash-tipping bandit, try a delay of one to five seconds, along with the fastest trigger speed. A longer delay and a lower-to-normal trigger speed is better for subjects that move a little slower, like browsing deer or turkeys.
Have Realistic Expectations
This is not 35-millimeter DSLR photography, so don’t expect that kind of image quality, Ms. Naser reminds impatient beginners. She also admonishes them not to check the cameras too often, because they’ll leave scent behind.
It’s not studio photography, either, with someone saying “lift your chin” or “turn this way a little more.”
“Scrolling through my SD cards, I say to the animals, ‘Oh, please turn around, please,’” Ms. Naser said. And then the next shot is another butt. Oops.
Skill comes with experience, she emphasized, including knowing the best places to set up. But luck also “really plays into the equation.”
In the meantime, learn to love those nose close-ups that you get when some curious animal communes juicily with the camera. Ms. Naser has a word for them: “Smelfies.”
For weekly email updates on residential real estate news, sign up here. Follow us on Twitter: @nytrealestate.
[ad_2]
Source link


